Salted Caramel Ice Cream


If you follow my Facebook page, you might remember that a few weeks ago, I was elated to come home to a long-lost package that I had been waiting months for.  As a graduation gift to myself (and using some random gift cards I found while getting ready to move across the country), I bought myself a brand new, cherry-red KitchenAid mixer.  As part of the promotion, I got a certificate for a free ice cream making attachment for the mixer-and I was completely pumped.  I had been dying to make ice cream on my own, but I had been waiting for the perfect opportunity to get my own attachment.  And here it was.

Well, I sent all the receipts, serial numbers, and rebate paperwork off once I moved to New England in June.  I had to move unexpectedly mid-August (remember the rodent infestation??? Did I ever tell you about that apartment?), so I promptly called KitchenAid to ask them to change the shipping address.  I did, and they said that the package would ship at the end of that week.  I waited…and waited…and waited…and waited…all the way to October, and still no ice cream maker attachment had found its way to my new apartment.  I finally called KitchenAid, and they claimed that they had delivered it to my apartment building and placed it outside the door (they had the tracking number and everything)…and that it had been delivered in August, but without my actual unit number.  I was totally bummed out to learn that one of my new neighbors had probably swiped my mixer attachment-especially because it wasn’t shipped in a non-descript cardboard box, but the actual mixer attachment box itself (so it was plain and clear to see what was in the box).  Thanks, awesome new neighbors.  You are probably also the ones who don’t clean up after your dog, either.  🙁

Needless to say, after talking to my apartment complex and confirming that it wasn’t accidentally delivered to the leasing office, I called KitchenAid to tell them of the situation.  They immediately sent me a new mixer attachment…and one day, I came home to the red, white, and black box sitting right outside my unit door.  I may have squealed with joy and texted at least 5 of my friends that I had finally received my new toy.

This was the first ice cream on the list of recipes to try.  After having the best ice cream of my life in Seattle at Canlis, I knew that I had to try it on my own.  And, so I did.  And I packed it into nice little pints so that I have a constant supply in my freezer (or I give them to friends).  This ice cream would be amazing with pumpkin pie or pecan pie at Thanksgiving…a little bit of that salty, creamy, sweet ice cream with some warm holiday pie?  Sign me up.

Salted Caramel Ice Cream

Servings: 2 pints

Ingredients

1 and 1/4 cups granulated sugar, divided

2 and 1/4 cups heavy cream, divided

1/2 teaspoon flaky sea salt

1/2 teaspoon vanilla extract

1 cup whole milk

3 large eggs


Instructions

1. In a deep and heavy saucepan over medium heat, melt 1 cup of the granulated sugar, stirring constantly to evenly heat, until it reaches a dark amber color.  **This only took me about 4-5 minutes.

2. VERY carefully, add 1 and 1/4 cups heavy cream to the melted sugar (it will boil up and splatter), and stir until the mixture is thoroughly combined.

3. Transfer the mixture to a bowl and add the sea salt and vanilla, mixing well.  Let the mixture cool to room temperature.

4. In another sauce pot over medium heat, bring the remaining 1 cup of cream, the whole milk, and the remaining 1/4 cup of granulated sugar to a boil, stirring frequently.

5. In a separate bowl, whisk the eggs together.

6. In a very slow and steady stream, add half of the hot milk mixture to the eggs, whisking constantly. **Adding the mixture slowly and stirring will prevent the eggs from cooking from the heat.

7. Once half of the hot milk mixture has been added to the eggs and mixed well, return the egg/milk mixture back to the sauce pot and cook over medium heat until the mixture reaches 170 degrees on an instant-read thermometer (don’t let it boil), and it coats the back of a wooden spoon.

8. Pour the hot egg/milk mixture into a fine-mesh sieve over a bowl (this will catch any little bits of egg that have cooked).

9. Add the cooled caramel to the strained custard and mix well.

10. Refrigerate the custard, stirring every hour or so, until completely chilled, about 4-5 hours.

11. Prepare the ice cream, according to your ice cream maker’s instructions, and pack tightly in air-proof containers and freeze.


Source: Directly from Gourmet, August 2009 via Epicurious.


November 22, 2011 - 5:47 am

Blog is the New Black - So glad it got replaced! 🙂 This sounds wonderful!

November 22, 2011 - 5:29 pm

natalie (the sweets life) - you will LOVE your ice cream maker–i’m obsessed with mine! 🙂 Salted caramel was one of our favorite flavors I’ve made so far!

November 22, 2011 - 6:05 pm

Ann P. - Salted caramel ice cream is my favorite! I would LOVE to try Canlis’ version. My favorite comes from Bi-Rite in San Francisco, but now I can make my own with this awesome recipe! Next thing on the list is an ice cream maker… 🙂

November 22, 2011 - 6:59 pm

Sue/the view from great island - This is wonderful…I just got myself a KitchenAid mixer, but my certificate is for a free meat grinder :/
Your ice cream looks amazing, I love the caramelly color.

November 22, 2011 - 7:00 pm

Sue/the view from great island - Oh, and come visit, I’m having a giveaway this week!

November 22, 2011 - 7:13 pm

Tara - Yum Shanon! This ice cream looks and sounds awesome!

November 24, 2011 - 4:16 am

Andrea @ Roadhouse Roast - Mmm, I’m yet to try salted caramel. I bet it would be good in an affogato too.

November 26, 2011 - 4:52 pm

Nicola @ unhip squirrel - Uh oh…. ice cream + sweet + salty…. I smell my ice cream addiction rearing its ugly head again.

November 28, 2011 - 1:56 am

Maria - I’m getting an ice cream machine soon! This looks really good.

Wild Mushroom Bread Puddings

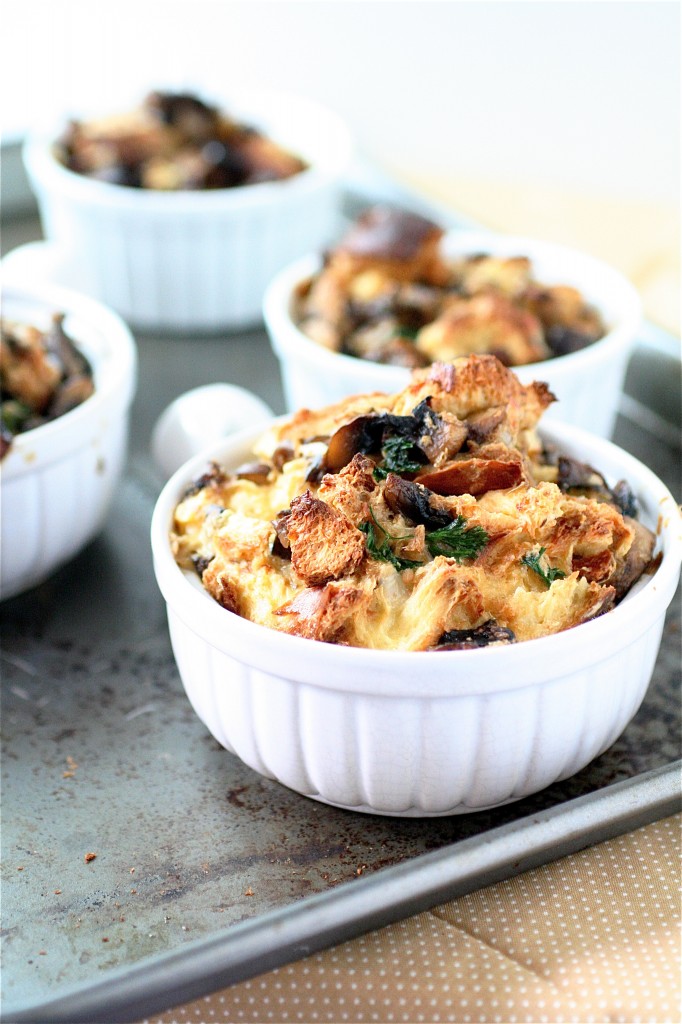
So, here’s my main course choice for Thanksgiving 2011.  I’m a sucker for individual-sized portions, seeing that last year, I chose Vegetarian Pot Pies as my Thanksgiving main course, I’m keeping that theme alive.

How can a vegetarian go wrong with mushrooms?  Savory, meaty, and filling, these guys have stolen my heart this year.  I went crazy at the market, experimenting with all different sorts of mushroom species (and I threw in the usual cremini and buttons to add some familiar flavors as well), and I have to say that I wasn’t disappointed.  This bread pudding (yes, while it’s a bread pudding, and I usually have consistency issues with them) held up very nicely and had a fantastic, savory flavor.  I made several portions of this, and I ate the leftovers as brunch the next morning with a poached egg on top (so you could use the leftovers for brunch the next morning!)  You don’t have to make these in individual ramekins-a usual casserole dish can be substituted instead.  I was a little frugal with the Parmesan cheese here, but I think any kind of mild cheese would do well with this-maybe I will try a Swiss next time.  Either way, this is a filling and satisfying vegetarian substitute (or a great side dish!) for this Thanksgiving.

Wild Mushroom Bread Puddings

Servings: 6 large ramekins or one 2-quart casserole dish


Ingredients

4 cups fresh bread, cubed **I used challah from the bakery-it was great!

1 and 1/2 pounds mixed fresh mushrooms (variety of your choice), cut into 1/4-inch pieces

1/2 cup shallot, finely chopped

Salt and pepper, to taste

2 tablespoons unsalted butter

1/2 cup parsley, chopped

2 cloves garlic, minced

2 cups half-and-half

4 large eggs

1/2 cup Parmesan cheese, grated

Instructions

1. Preheat the oven to 350 degrees.

2. On a rimmed baking sheet lightly sprayed with cooking spray, spread the bread cubes out evenly, and bake until toasted, about 10 minutes; set aside.

3. In a sauté pan over medium heat, melt the butter.

4. Add the shallot, and cook, stirring frequently, until the shallot is softened, about 3-4 minutes.

5. Add the mushrooms, salt, and pepper, and cook, stirring frequently, until the mushrooms have lost most of their liquid, about 15 minutes or so.

6. Add the parsley and garlic and cook for another 2 minutes.

7. Remove the pan from the heat.

8. In a large bowl, whisk together the half-and-half, eggs, and Parmesan.  Add salt and pepper, if desired.

9. Add the cooked mushrooms and bread cubes to the bowl, tossing to coat them thoroughly with the egg mixture.  Let stand at room temperature for about 10 minutes so that the bread can soak up the egg mixture.

10. Spray the ramekins/casserole generously with cooking spray and spoon the mixture into them.

11. Place the ramekins on a baking sheet and bake for 30-35 minutes.  Serve immediately.


Source: Gourmet, December 2007.


November 20, 2011 - 5:15 pm

Ann P. - i love mushrooms! those puddings look delicious–I love how you portioned them off for individual servings, too 🙂

November 20, 2011 - 6:42 pm

Sue/the view from great island - I’m liking the idea of savory bread puddings. Any time shallots and mushrooms and cheese are involved, I’m in heaven.

November 20, 2011 - 8:57 pm

Heidi / foodiecrush - Wow, I would eat that absolutely anytime of the year. And I don’t have an issue with the mush of bread pudding or stuffing, in fact thats what I love about it! You could give a gruyere or fontina a try for some serious goo.

November 20, 2011 - 9:36 pm

Kelsey - Oh wow…these look delicious. My husband and I love mushrooms!

November 20, 2011 - 10:37 pm

elly - These sound so delicious! I am totally a sucker for mushrooms in anything, and I love the cuteness of the individual servings. 🙂

November 20, 2011 - 11:29 pm

Christin - Wow! Looks amazing! I like Heidi’s suggestion of adding gruyere or fontina. You can’t ever have too much cheese.

November 21, 2011 - 4:28 pm

Stella - Could you substitute skim milk for the half and half? Looks great! I’m going to add it to my holiday menu!

November 21, 2011 - 4:35 pm

srlacy - Hi Stella-

I think you could definitely substitute skim milk-it should thicken up just like the half-and-half, but the texture may not be as creamy. Let me know how it turns out-that would be a great way to cut back on more calories!

November 22, 2011 - 1:49 am

Jesica @ Pencil Kitchen - if this is your entree…. I can’t begin to imagine what your main dish would be like…. oooo…. the suspense is killing me.

November 22, 2011 - 10:14 am

Dara - I LOVE it. What an awesome recipe. I am dying to try this. I linked to it on my site.

November 22, 2011 - 3:28 pm

Beth - These look amazing! I’m definitely on an individually sized portion kick as well. We almost never do a vegetarian entree for Thanksgiving, because all the vegetarians just eat extra sides (really, Thanksgiving is all about mashed potatoes and stuffing for me), but these look really wonderful. I love the idea of having them with a poached egg on top for brunch too.

November 23, 2011 - 1:37 pm

Carol - Oh my goodness, this looks incredible! What a great veg option for Thanksgiving! Someday when I host my own, I’ll definitely try making these.

November 23, 2011 - 4:47 pm

Erik - Fabulous idea, surely going to give it a try..

November 23, 2011 - 6:53 pm

last minute turkey day ideas « three blondes and a tomas - […] mushroom bread pudding from the curvy carrot […]

November 27, 2011 - 8:40 am

Pilar - Hello. It´s scrumptions, I love it. But, What do you mean with half and half?. Is it cream?
Thanks from Spain.

November 27, 2011 - 10:21 am

srlacy - Hi Pilar-

Yes, half-and-half is an American type of cream. You can substitute equal parts of milk and cream for the amount if you don’t have access to it. (Or, you could make it with all cream…which would probably taste really really good!)

May 16, 2012 - 8:28 am

Alex - Just made this today with Gruyere and it was wonderful! Thanks!

April 13, 2014 - 9:41 am

Amber - Made this in a large casserole dish last night with fresh ‘shrooms from our market. Ohmygosh, wonderful!!!! 🙂

Fresh Green Bean Casserole

I have a confession to make.  A dirty, awful, secret that I have been keeping for years.

I’m a sucker for green bean casserole….you know, the kind with the canned condensed soup and the dried onions that come in a cardboard cylinder.  It’s probably my favorite side dish at Thanksgiving each year.

I don’t know why this is a dirty secret.  I’m not ashamed.

But, you see, I have really been trying to cut back on lots of food with preservatives. I already put salt on lots of food sheepishly, and when I read the labels on many of these pre-packaged ingredients, I feel a little nervous about the amounts of fillers, additives, and extra surprises I am adding to my food.  I allow myself usually one processed item per day (my Smartfood white cheddar popcorn…it’s like crack to me), but the rest of what I eat is limited to straight up, pure, or almost-as-pure-as-possible food (unless we are talking about chocolate, especially snack size chocolate bars, which are also like crack to me).  A couple of years ago, when I cut back on things like that and started exercising a bit, I lost over 30 pounds.  I find that when I cut things out like carbonated beverages, excess sugar, or preservatives, I sleep better, I have more energy, and I don’t feel sick after eating as much (because I am usually eating while I work).

So, this year I wanted to find a green bean casserole that could be an easy substitute for the other version.  This is pretty awesome, people.  Granted, it’s not as simple to assemble as the “other” version (and, trust me, I will probably be eating the other version this year since I will be a guest at this year’s Thanksgiving festivities instead of being the host, and I will eat it with great enjoyment), but it’s extremely tasty.  There’s nothing like using the freshest ingredients possible when cooking.


Fresh Green Bean Casserole

Servings: approximately 6 side-dish servings


Ingredients

For the topping:

2 medium yellow onions, thinly sliced

1/4 cup all-purpose flour

2 tablespoons panko

1 teaspoon sea salt

For the casserole:

2 tablespoons sea salt (for boiling the green beans), plus an extra 1 teaspoon sea salt

1 pound fresh green beans, cleaned, trimmed, and halved

2 tablespoons unsalted butter

12 ounces assorted mushrooms (I used a mixture of white button and cremini), cleaned and cut into 1/2-inch pieces

2 cloves of garlic, minced

Pinch nutmeg

2 tablespoons flour

1 cup vegetable broth

1 cup half-and-half

Salt and pepper, to taste

Instructions

1. For the topping: Preheat the oven to 475 degrees.

2. In a large bowl, combine the onions, flour, panko, and salt, tossing lightly to thoroughly coat the onions with the flour mixture.

3. On a rimmed baking sheet lightly sprayed with cooking spray, spread the onions out in an even layer, and bake, tossing the onions occasionally during baking to allow for even cooking, for about 30 minutes.  Once the onions are cooked, decrease the oven temperature to 400 degrees (you will bake the casserole at this temperature.)

4. For the casserole: Meanwhile, bring a large sauce pot of water and the 2 tablespoons of salt to a boil.

5. Add the green beans to the boiling water and cook for 5 minutes.

6. Drain the beans and immediately plunge them into a bowl of ice water to prevent overcooking; drain and set aside.

7. In a sauté pan over medium-high heat, melt the butter.

8. Add the mushrooms and salt and pepper (to taste), and cook until the mushrooms are softened, about 4-5 minutes.

9. Add the minced garlic and the nutmeg, and cook, stirring frequently, for another 1-2 minutes.

10. Sprinkle the flour over the cooking mushrooms and stir to coat thoroughly, and cook for another minute.  Add the broth and continue to simmer for another minute.

11. Decrease the heat to medium-low and add the half-and-half, stirring frequently, and cook until slightly thickened, about 6-8 more minutes.

12. Remove the pan from the heat and stir in 1/4th of the cooked onions and all of the green beans.

13. Transfer the mixture to a 1.5-quart casserole and top with the remaining onions.

14. Bake for 15 minutes.  Serve warm.


Source:  Slightly adapted from Alton Brown via the Food Network.


November 18, 2011 - 6:35 am

Caroline - I’m not ashamed to say that I loveee the old fashion green bean casserole. And I don’t think it’s all that bad because I eat it only once a year. And I have tried “healthier” or fresher version of the green bean casserole but there’s something about that condensed soup and salty fried dried onions that makes me choose it over the “better” one.

November 18, 2011 - 4:34 pm

Aly ~ Cooking In Stilettos - Can I be frank – I’ve had the “other” one and I just didn’t like it. However, I made Chef Alex Guaranschelli’s last year and it’s a tried and true. I think it’s probably my avoidance of condensed soup after learning all that I’ve learned about it that will stop me from eating any that’s not made like her’s or Alton’s.

November 18, 2011 - 4:44 pm

Anna - I hate the traditional green been casserole. That nasty cream of mushroom soup and those disgusting weird onion things on the top…. yuck! This recipe sounds absolutely delicious other than the fact that I also don’t like mushrooms. I wonder if there would be a way to make it without mushrooms. Hmmm, I might have to experiment with that.

November 18, 2011 - 11:43 pm

Tessa - Thanks for this. I love traditional green been casserole too, but much like you, I have been trying to cut processed foods out of our diets. I am definitely saving this recipe!

November 25, 2011 - 5:50 pm

And … on the other side of Thanksgiving! « Scraps of Me - […] is courtesy of The Curvy Carrot and yeah, my casserole looked just like her […]

November 27, 2011 - 2:23 pm

Tina - Is it me or is the vegetable broth missing from the directions?

I made this for Thanksgiving and it was a HIT! In fact, I’m headed to make my 2nd batch right now. Thanks for the wonderful and healthy recipe.

November 27, 2011 - 2:26 pm

srlacy - OH MY GOSH! Tina, thank you so much! Yes, I omitted the broth. It’s all fixed now. Thank you again! 🙂

April 5, 2012 - 12:51 pm

The Curvy Carrot » Fresh Green Bean Casserole | green-bean-casserole - […] The Curvy Carrot » Fresh Green Bean Casserole This entry was posted in Uncategorized and tagged attribution, creative, creative-commons, […]