
Malted Milk Ball Cupcakes


It just goes without saying that cupcakes are pretty much my favorite thing to make in the kitchen.  I love the versatility, the creativity, and the individual portability of each one.  There’s a billion recipes out there to try, tons of different piping tips to experiment with, and lots of days to brighten with impromptu cupcakes.

Growing up, I hated malted milk, chocolate malts, or Whoppers candies.  My mom loves them.  Whenever she would come home with a chocolate treat from the store, it was usually one of those big containers of Whopper candies.  And, there it would sit in the kitchen, untouched by me, the girl who just wished she would have brought home some M&M’s or Junior Mints instead.  I think this was her strategy.  She knew that I wouldn’t touch them.  If I was desperate, then they would suffice.

Later on, my dad turned me on to chocolate malts.  I don’t remember when, but I do remember getting them with him at a local ice cream parlor as a kid.  Yum.  This malt flavor was growing on me.

Which is why, when a colleague requested chocolate malt cupcakes for his birthday, I was a little hesitant.  I still don’t care too much for the malt flavor, but I figured…why not?  It’s worth a shot…maybe I will be pleasantly surprised and remember why I started liking chocolate malts as a kid.   And, since cupcakes are my favorite thing to make, it shouldn’t be so bad.

I went with Martha Stewart’s chocolate malt cupcake recipe…and it’s a very modest malt flavor.  It’s there, but it’s definitely subtle.  Not in-your-face-over-the-top malt flavor…which is just the way I like it.  To add to the flavor, I decided for a rich, creamy chocolate malt buttercream for the top, with a few of those Whoppers on top, of course.

Taken with a glass of cold milk, these could definitely suffice.
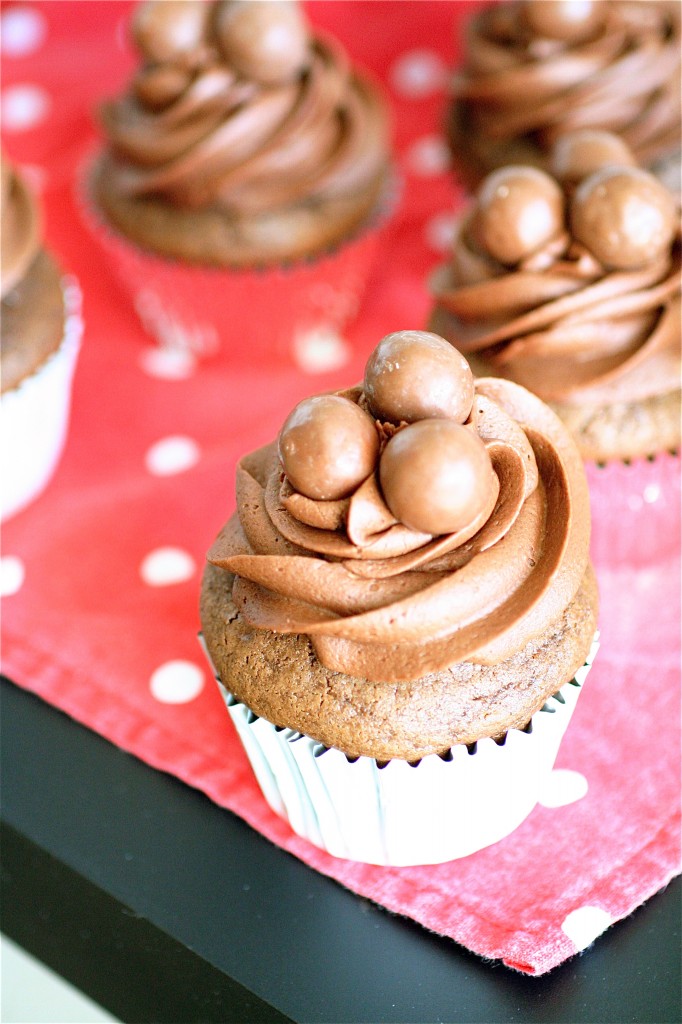
Malted Milk Ball Cupcakes

Servings: approximately 24 cupcakes


Ingredients

For the cupcakes:

2 and 1/4 cups all-purpose flour

3/4 cup unsweetened cocoa powder

1/2 cup granulated sugar

3/4 cup packed light brown sugar

1 and 1/2 teaspoons baking soda

1/2 teaspoon salt

1 cup milk

1 and 1/4 cups malted milk powder

1 cup vegetable oil

3 large eggs, at room temperature

1 cup sour cream, at room temperature

1 teaspoon vanilla extract

For the frosting:

2 sticks (16 tablespoons) unsalted butter, at room temperature

2 teaspoons vanilla extract

1/4 teaspoon salt

4 cups powdered sugar

1 cup unsweetened cocoa powder

1 cup malted milk powder

10 tablespoons milk

For garnish:  Whopper candies

Instructions

1. For the cupcakes: Preheat the oven to 350 degrees.

2. Line a cupcake pan with the liners of your choice; set aside.

3. In a large bowl, whisk together the flour, cocoa powder, granulated sugar, brown sugar, baking soda and salt.

4. In another small bowl, whisk together the milk and the malted milk powder until smooth.

5. In the bowl of your standing mixer fitted with the paddle attachment, beat the flour and milk mixtures together on medium speed.

6. Slowly add the oil to the batter, and mix to incorporate.

7. Add the eggs, one at a time, mixing well after each one.

8. Add the sour cream and vanilla, mixing until just combined, scraping down the sides of the bowl as necessary.

9.  Divide the batter among the prepared cupcake liners and baking until a tester inserted into the center comes out clean, about 20 minutes or so, rotating and switching the pans halfway through the baking time (if baking two pans at a time). Let cool completely before piping.

10. For the frosting:  In the bowl of your standing mixer fitted with the paddle attachment (or using an electric hand mixer), beat the butter, vanilla, and salt at medium-high speed until light and fluffy, about 2 minutes.

11. In a separate bowl, whisk together the powdered sugar, cocoa powder, and malted milk powder.

12. In three separate turns and on low speed, alternate adding the powdered sugar mixture with the milk to the butter mixture, mixing until smooth and creamy.  Pipe as desired onto the cupcakes.

Sources:  Cupcakes from Martha Stewart’s Cupcakes and frosting from My Recipes


January 10, 2012 - 8:07 am

Blog is the New Black - Love love love whoppers and anything malt! Delish!

January 10, 2012 - 2:59 pm

Lori @ RecipeGirl - When I was a teenager, I worked at a little ice cream shop and we had access to all the malt we wanted. I’ve been obsessed ever since. These look scrumptious!

January 10, 2012 - 4:00 pm

Rachel @ Baked by Rachel - These are so cute! I buy those candies for hubs every Christmas. I bet he’d love these cupcakes.

January 10, 2012 - 7:33 pm

Ann P. - These look beautiful, and sound like they taste AMAZING! I am a fan of malt balls 🙂

January 11, 2012 - 7:25 pm

Kristi @ My San Francisco Kitchen - What a neat idea! They look so yummy, I just want to eat one right out of the photos! Great blog, glad I found you 🙂

January 11, 2012 - 9:17 pm

Happy When Not Hungry - These cupcakes look amazing! I love malt balls. Yum!

January 11, 2012 - 10:49 pm

MERCEDES - I love anything malt and these look so perfect and mouthwatering!

February 18, 2012 - 12:56 pm

Averie @ Love Veggies and Yoga - These look fabulous. Repinned!!!

April 29, 2012 - 8:46 pm

Malted Milk Ball Cupcakes | The Baking Blog - […] and recipe available at The Curvy Carrot Posted by admin in All Chocolate Cupcakes, Cupcakes and tagged with baking, baking blog, […]

April 28, 2013 - 7:26 pm

Malted Milk Ball Cupcakes - […] source:  thecurvycarrot.com […]

May 26, 2013 - 8:18 pm

Whoppers Cupcakes | Cupcake Artist - […] light, and fluffy. I have the recipe on this post for my Milky Way Cake. Then I used from thecurveycarrot the recipe for the malted milk chocolate buttercream. I wanted a recipe that didn’t use […]

October 31, 2014 - 9:36 am

Recipes Using Whoppers - Love From The Oven - […] Malted Milk Ball Cupcakes From The Curvy Carrot […]

Bean Burritos

I have a funny story for you.  A kitchen failure which, ironically, turned into a kitchen victory.  Love it when that happens.  My kitchen fails have been coming in droves, it seems, so this when this happened, I was shouting expletives so loud that I’m pretty sure my neighbors were concerned for a few minutes there.

I had seen both Josie and Annie post these burritos on their blogs, and I had been dying to try them.  Something to make on a weekend (or, actually, these are so quick they are great for weeknights, too) that I could have extra leftovers to reheat in the evenings.  I stocked up on my ingredients at the grocery store (actually, in all honesty, quite proud of my efficiency in the store..I have since learned my lesson…) and headed home for a date with my kitchen.  I may or may not still have been in my pajamas (that’s the benefit of living in a place where a full-length down parka is the norm-it can hide my pj’s..)  After some major apartment cleaning (and the impromptu and smart(?) idea to rearrange all the furniture in my living room), I took a break to make these burritos.  So, there I was, in my pj’s in my half-rearranged apartment, starting to sauté some shallot on my stove, when I went to open the can of black beans….

….and they were kidney beans.  I must have grabbed the wrong can in my so-thought efficiency at the store.  And there wasn’t a spare in my pantry.

I couldn’t leave in the middle of already cooking the onions and spices (and not that I wanted to anyways), so, after the expletives, I decided to forge ahead and just make the burritos with kidney beans.  I mean, they are beans.  Can they make that much of a difference anyways?  I started to divert my thoughts to trying to convert the recipe over to some Cincinnati chili burrito recipe (still thinking about that one, by the way), but then got too intimidated on the fly and followed through with the original.

Victory!  These were some a-may-zing burritos.  Seriously.  It worked.  I will make them again.  The kidney beans added a bit of earthy flavor, but I honestly didn’t think there was a huge difference from the black beans.  So, feel free to add the black beans in, but if you’re feeling slightly scatterbrained or have them on hand, I would recommend experimenting with the kidney beans.

Bean Burritos

Servings:  4 burritos

Ingredients

2 teaspoons vegetable oil

1 medium shallot (or small onion) chopped finely

3 cloves garlic, minced

1 teaspoon chili powder

1 teaspoon cumin

Sea salt, to taste

1/3 cup water

One 15-ounce can kidney beans, drained and rinsed (or black beans….)

One 15-ounce can pinto beans, drained and rinsed

Four 8-inch flour tortillas

Toppings:  Shredded cheese, lettuce (I used spinach-it worked), onions, tomatoes, etc.

Instructions

1.  In a large sauté pan over medium heat, heat the oil until shimmering.

2. Add the shallot and cook, stirring often, until softened, about 4-5 minutes.

3. Add the garlic, chili powder, cumin, and salt, and cook for about 1 more minute.

4.  Add the water and the beans to the mixture, and bring to a boil.

5. Once boiling, decrease the heat to medium-low and simmer, uncovered, for about 10 minutes.

6. To assemble the burritos: spread a few tablespoons of the hot bean mixture in the center of the tortilla and top with additional garnishes as desired.  Roll the burrito, and serve immediately.


Sources:  Adapted from Annie’s Eats,  seen on Pink Parsley Catering, originally from Cooking Light.


January 8, 2012 - 10:19 am

Blog is the New Black - These look great to me, even with the kidney beans! Great fail! 😉

January 8, 2012 - 12:27 pm

Melissa @ Kids in the Sink - I always just sub in whatever beans I have on hand. I have made these too and they’re on our blog but I can’t even remember which beans we used. Just know they were delicious! Oh and I think ours had chipotle in them too. I love it when kitchen fails turn into something equally delicious!

January 8, 2012 - 2:41 pm

Claire - Ha, too funny, I was planning to make these but realized that I only had one can of beans and didn’t have that frozen bag of tortillas that I though I had. (Though, I guess that gives me all the reason to try Annie’s homemade tortilla recipe, eh?)

January 8, 2012 - 5:42 pm

Ann P. - I have a friend that would LOVE these! They seem way healthier than the bean burritos from the usual joints around my place 🙂

January 8, 2012 - 11:32 pm

sara - Yum, I love vegetarian burritos! These look really fantastic – yum! 🙂 Great photos!

January 8, 2012 - 11:37 pm

Laurel @ Lolly's Sweet & Savory Treats - Chocolate chip cookies were invented by accident! Sometimes mistakes are glorious- just like your bean burritos. These look delicious.

January 9, 2012 - 3:04 pm

Krissy @ Krissy's Creations - Bean Burritos are one of me and my husbands favorites! He doesn’t even miss the meat. Great recipe!

April 21, 2013 - 5:47 pm

Bean Burritos | Well Cooked - […] Recipe Link […]

May 8, 2013 - 10:54 am

Bean Burritos - […] For recipe visit:  thecurvycarrot.com […]

May 8, 2013 - 3:02 pm

Val - I’m eating one of these Bean Burritos as I enter this comment….They are fantastic, followed the recipe, except left out the Pinto Beans (didn’t have any on hand). I didn’t try any substitutes. So with Kidney Beans only, the Burritos still are fantastic. As toppings I used fresh-made Pico de Gallo, chopped leafy Lettuce & a bit of grated cheese. Love your Blog, keep up with the great recipes….

May 8, 2013 - 3:07 pm

srlacy - Yay! So glad to hear that! Thanks, Val!

January 19, 2014 - 11:07 am

mark - just cooked these very nice indeed. i added a a bit of fresh coriander and a squeeze of lime juice but only because i had both to hand and needed to use.

thanks for the recipe

January 19, 2014 - 11:09 am

mark - just spotted the lime wedges in the pic so that must’ve been the inspiration. thanks again

Soft and Chewy Chocolate Chip Cookies

Happiness is a warm chocolate chip cookie.  No, wait.  Happiness is coming home from work one week night and realizing that in less than 20 minutes, warm chocolate chip cookies could be possible.  While I will admit that my motivation for certain weeknight type activities (i.e. laundry, de-cluttering my dining room table, or possibly even studying….) is, at times, minimal (to say the least), my motivation for cooking/baking on weeknights never seems to run out.  And, the best part?  I hadn’t even worked these cookies into my weekly menu plan.  These cookies were straight-up spontaneous comfort food from the heart.  Even better, a friend just happened to stop by that evening to drop off something, and I was able to give her half a batch of chocolate chip cookies (for fear that I would eat them all)….literally straight from the oven.  Talk about perfect timing.

I’ve been dabbling with several different chocolate chip cookie recipes.  I mean, come on.  We all know you can never have too many chocolate chip cookie recipes.  This one comes directly from the collection of Martha Stewart.  It’s a soft and chewy chocolate chip cookie (hence the name), but it packs a lot of vanilla flavor, which I happen to like.  They weren’t as soft as some of the other types of chocolate chip cookies I have tried, but they definitely are a top contender for my favorite.   They didn’t get runny or too crispy, they had an ample amount of chocolate chips, and they definitely satisfied my spontaneous sweet tooth.

Looking for some more chocolate chip cookie recipes?

Super Peanut Butter Drop Cookies

Thin and Crispy Chocolate Chip Cookies

Peanut Butter Chocolate Chip Cookies

Triple Chocolate Cookies

Kitchen Sink Cookies

Chocolate Chip Cookies

Soft and Chewy Chocolate Chip Cookies

Servings:  approximately 36 cookies

Ingredients

2 and 1/4 cups all-purpose flour

1/2 teaspoon baking soda

1 cup (2 sticks) unsalted butter, at room temperature

1/2 cup sugar

1 cup packed light brown sugar

1 teaspoon salt

2 teaspoons vanilla extract

2 large eggs

1 bag (12 ounces) semisweet chocolate chips


Instructions

1. Preheat the oven to 350 degrees.

2. Line baking sheets with parchment paper; set aside.

3. In a large bowl, whisk together the flour and baking soda; set aside.

4. In the bowl of your standing mixer fitted with the paddle attachment, cream the butter and sugars together on medium speed until light and fluffy, about 2 minutes.

5. Decrease the mixer speed to low and add the salt, vanilla, and eggs, mixing well until thoroughly combined, scraping down the sides of the bowl as necessary.

6. With the mixer speed still on low, add the flour mixture, mixing until combined.

7. Using a rubber spatula, gently fold in the chocolate chips until evenly distributed.

8. Using a cookie dough scoop or tablespoon, drop the cookie dough in mounds (about a tablespoon’s worth or so) onto the baking sheets, spacing them about 2 inches apart.

9.  Bake the cookies, rotating and switching the pans halfway through the baking time (if baking two sheets at a time), until the edges are light brown, about 10 to 12 minutes.

10. Transfer the cookies to a wire rack and let cool.


Source: Martha Stewart’s Cookies.


January 6, 2012 - 2:19 pm

Ann P. - I love how you put the whole 12oz bag in there!! The more chocolate, the better!

January 6, 2012 - 6:36 pm

Krissy @ Krissy's Creations - So true! Warm Chocolate Chip Cookies = Happiness. They are the ultimate comfort dessert. I love that these are soft & chewy. I’d love to try your recipe 🙂

January 8, 2012 - 3:53 pm

Casey - Mmm, your cookies look and sound great! For some reason when I make regular chocolate chip cookies they turn out flat quite a bit, which is supposedly from overbeating the eggs. Your recipe sounds fabulous 🙂

January 8, 2012 - 4:45 pm

Sue/the view from great island - These look great, I collect chocolate chip cookies too. The chewier and chocolaty-er the better.

January 9, 2012 - 3:21 pm

Betsy - I made a batch of these before Christmas and they didn’t last the day. My husband is a soft cookie nut and loved how they were still pliable in the middle with just a hint of crispy edge. I like how the extra brown sugar gives it a touch of carmel/butterscotch flavor.

April 5, 2012 - 1:16 pm

Benthe - These were so good!

August 27, 2013 - 12:45 am

Soft and Chewy Chocolate Chip Cookies | The Baking Vet - […] From: http://www.thecurvycarrot.com/2012/01/06/soft-and-chewy-chocolate-chip-cookies/ […]

October 2, 2014 - 4:37 am