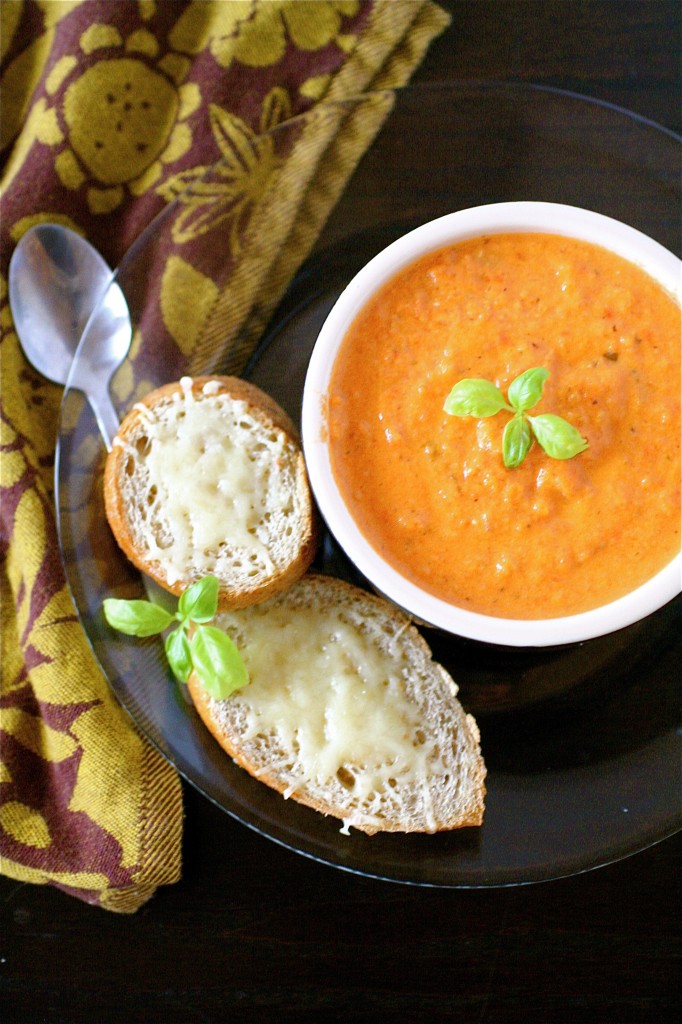
Tomato Basil Soup

Hellloooo!

I hope you all had/are having a fantastic holiday season.  I was able to spend some time back in Indianapolis where I was extremely productive:

1. Visiting with friends, including one of my favorite pizza places in the entire world (and I am including a personal visit with a margherita pizza as one of my best friends.)

2. Numerous trips to the Imax theater after realizing that I hadn’t seen a movie in a theater for roughly 6 months.  Also included in these trips were big tubs of horrific (but yet so tasty) butter-ish laden popcorn, 3D glasses, getting a case of the giggles during a movie when it probably was not appropriate (which actually just makes everything waaaaayyy more funny), and sitting next to my kid brother and feeling like I was 12 years old again.

3. My mother transferred all of our home videos from warped VHS tapes over to DVD’s.  Which then ensued hours of bad bangs, stretch pants, and innumerable musical theater performances by yours truly.  It also included the time I videotaped (because I was super awesome and had figured out how to hold the giant camera on my shoulder) my little brother (just a toddler at the time) singing in his diaper to the Lion King soundtrack.  Those random moments are invaluable now.  It also included me giving a tour of my totally rad/tubular splatter-painted bedroom with my new Marky Mark and the Funky Bunch tape playing in the background from my enormous bedazzled (yes, I bedazzled it) boombox.  I’d like to think that I have become way more sophisticated and professional now, but deep down I know that some things will never change.  If you know me personally, well, then, you will whole-heartedly agree.

4.  Sorry, Tony Horton.  My God, I love you and your Forrest Gump impressions.  I love your jokes about Pam the Blam.  I love your justification of om’s.  But, after completing Phase 2 of P90x (ummm, holy cow.  I seriously have muscles.  My pants don’t fit anymore.), I have to take a few days off (like, 3 days of a break.)  Don’t get me wrong.  It’s not a complete break-up.  I’ll come crawling back, begging you to tell me to “Bring it!” some more, and I will.  It’s just the last few days of 2012, and I have got to relax a little, eat some cheese, and maybe drink a glass of champagne (or two.  Or three.)

Tangent over.


Here’s a soup that I had been dying to try for a long time.  It was the cream cheese in the soup that had me intrigued.  Umm, hello? Cream cheese?  In a soup that is a “light” version of a regular cream-based soup?  Well, ok.  Taking the guilt out of eating cream cheese is a small miracle, in my humble opinion.  So I tried it.  It’s just *a smidge* heavenly.  It has a bright tomato flavor, but that creamy goodness makes it impossible to not keep eating.  As far as a vegan version, I have not tried it.  I am not sure if a vegan version would work here, but if you are up to the challenge, let me know how it turns out.  I broiled some garlic-rubbed French bread and then topped it with some freshly grated Parmesan cheese and popped that under the broiler for a few minutes-pretty awesome and simple.

 

Tomato Basil Soup

Servings: about 4


Ingredients

1 tablespooon extra-virgin olive oil

1 medium onion, chopped

3 garlic cloves, minced

3/4 cup fresh basil, chopped

One 28-ounce can fire-roasted diced tomatoes, with juices

4 ounces low-fat cream cheese (1/2 a brick), cut into pieces

2 cups skim milk

Salt/pepper, to taste


Instructions

1. In a Dutch oven or large sauce pot over medium-high heat, heat the olive oil until shimmering.

2. Add the onions and cook, stirring frequently, until translucent and softened, about 3-5 minutes.

3. Add the minced garlic and cook, stirring, until fragrant, about 1 minute or so.

4. Add the entire can of tomatoes (including juices) and the chopped basil, mixing well. Bring the mixture to a boil.

5. Add the cream cheese, stirring until melted and thoroughly incorporated.

6. Using an immersion blender (or a blender, in batches…be very careful-this is obviously extremely hot stuff), blend the soup until smooth.

7. Once smooth (or at least until it is of your desired consistency), add the milk and season to taste with salt and pepper. Let simmer for a few more minutes until the milk is heated through and serve.

Source: Cooking Light.


December 30, 2012 - 7:46 am

Katrina @ Warm Vanilla Sugar - This looks so tasty! Love this recipe 🙂

January 2, 2013 - 5:55 pm

a farmer in the dell - I LOVE tomato basil soup. A side of grilled cheese and i’m in my happy place. Thanks for another great recipe!

January 6, 2013 - 6:58 pm

georgia - Oh Shanon, I am glad you are enjoying your DVD’s! Early lifetime of memories and you have many new memories! Oh ya the soup looks yummy of course! Love you!
Mom

January 22, 2013 - 7:38 pm

Nan - I made this a few weeks ago and it was great! I will definitely make it again. Thanks!

January 27, 2013 - 12:36 pm

Friday Favorites…2013: Week 4 « Okay, Kaye? - […] this Tomato Basil Soup looks yummy (I’ve never made homemade tomato soup and want to […]

January 27, 2013 - 7:50 pm

Lisa - I can’t find fire roasted tomato, what would be a good substitute. Thanks!

January 27, 2013 - 8:34 pm

srlacy - Hi Lisa-

If you can’t find fire-roasted tomatoes, then just use regular diced tomatoes. You might want to play around with some additional spices to add a bit more flavor, but just play around according to your own taste.

May 1, 2013 - 2:03 pm

Tomato Basil Soup - […] source:  thecurvycarrot.com […]

January 31, 2014 - 3:16 am

lena zapassky - Fantastic idea, this looks so tasty!

Chocolate Peppermint Cream Cheese Cupcakes


Suddenly it’s mid-December and the holiday season is upon us.  How in the world did it arrive so quickly this year?

I figured I should post a cupcake recipe since I haven’t posted one in ages.  I forgot how much I love to make them, to be honest with you.  I find that sometimes the process of baking is an extremely cathartic one, and I know a lot of you do, too.  No matter what is going on in the world, I can go into my kitchen and immerse myself in one of the things I love most.

So, during the baking and prepping of the cupcakes, CNN was playing in the background, and I was focusing on being grateful for my two little nephews, Elliott and Oliver.  For the fact that in a few days I will be able to hug them and tell them how I love them oh-so-much.  I thought about a lot of things, really.  I focused on sending love to Connecticut.  I focused on being thankful for so many people who had so quickly formed a solid support network for so many others.  I focused on sending love to my friends with young children and being thankful for their safety.

I can’t say enough how much I have been touched by our fellow Americans in such a sad time.  I know that I’m a piddly little food blog, but I have been amazed by the outpouring of love and encouragement for those who are hurting the most.

So I put a little extra something into these cupcakes.  A little hope.  A little encouragement.  And a lot of love.


Chocolate Peppermint Cream Cheese Cupcakes

Servings: 30 cupcakes


Ingredients

For the cupcakes:

3/4 cup unsweetened Dutch-process cocoa powder

3/4 cup hot water

3 cups all-purpose flour

1 teaspoon baking soda

1 teaspoon baking powder

1 and 1/4 teaspoons coarse salt

1 and 1/2 cups (3 sticks) unsalted butter

2 and 1/4 cups sugar

4 large eggs, room temperature

1 tablespoon plus 1 teaspoon pure vanilla extract

1 cup sour cream, room temperature

For the peppermint cream cheese filling:

40 small candy canes, unwrapped and broken into small pieces (*the original recipe called for soft peppermint candies, like old-fashioned peppermint sticks.  I couldn’t find these in the store, so I improvised.)

2 cups powdered sugar

4 ounces (1/2 brick) cream cheese, at room temperature

4 tablespoons heavy cream

For the peppermint cream cheese buttercream:

1 and 1/2 cups (3 sticks) unsalted butter, at room temperature

16 ounces (2 bricks) cream cheese, at room temperature

8 cups powdered sugar

3/4 teaspoon vanilla extract

1-2 teaspoons peppermint extract, to taste

Additional candy cane pieces, for garnish


Instructions

1. For the cupcakes: Preheat the oven to 350 degrees.

2.  Line standard muffin tins with paper liners.

3.  Whisk together the cocoa and hot water until smooth.

4. In another bowl, whisk together the flour, baking soda, baking powder, and salt.

5. Melt butter with sugar in a saucepan over medium-low heat, stirring to combine.

6. Remove from heat, and pour into a mixing bowl.

7. With an electric mixer on medium-low speed, beat until mixture is cooled, 4 to 5 minutes.

8. Add eggs, one at a time, beating until each is incorporated, scraping down the sides of the bowl as needed.

9. Add vanilla, then cocoa mixture, and beat until combined.

10.  Reduce mixer speed to low.

11. Add flour mixture in two batches, alternating with the sour cream, and beating until just combined after each.

12.  Divide batter evenly among lined cups, filling each three-quarters full.

13.  Bake, rotating tins halfway through, until a cake tester inserted in the centers comes out clean, about 20 minutes.

14.  Transfer tins to wire racks to cool 15 minutes; turn out cupcakes onto racks and let cool completely.

15. For the peppermint cream cheese filling:  In the bowl of your food processor, pulse the candy cane pieces until the mixture is powdery (this will be very loud.) and the pieces are about the size of coarse sea salt.

16. In a medium bowl, whisk together the powdered candy canes and 1 cup of the powdered sugar.

17. In the bowl of your standing mixer fitted with the paddle attachment, beat the cream cheese with the heavy cream on medium speed until combined.

18. Reduce the mixer speed to low and add the remaining 1 cup of powdered sugar to the cream cheese mixture; beat until smooth.

19. Add the candy cane mixture to the mixer bowl, beating on low speed until smooth.  Set aside.

20. For the peppermint cream cheese buttercream frosting:  In the bowl of your standing mixer fitted with the paddle attachment, beat the cream cheese and the butter on medium speed until light and fluffy, about 2 minutes.

21.  Reduce the mixer speed to low and add the powdered sugar, 1/2 cup at a time, until smooth.

22. Add the vanilla, mixing well.

23.  Add the peppermint extract, adjusting to taste.


Sources:  Cupcakes and frosting from Martha Stewart’s Cupcakes, peppermint filling adapted from The Kitchn.


December 18, 2012 - 8:52 am

Blog is the New Black - These look great!

December 18, 2012 - 10:11 am

Claire @ Simply Sweet Justice - Baking is just therapeutic because it is done with love! 🙂

December 18, 2012 - 12:55 pm

Meghan - Hi, Shanon! I know you’re doing P90X now and I just wanted to send you my support. I attempted to do it a year and a half ago but because of, well, life I never completed it. I’m trying it again now and it feels great. Best of luck to you!

December 18, 2012 - 2:31 pm

Katrina @ Warm Vanilla Sugar - These look fabulous!

February 27, 2013 - 12:28 pm
April 30, 2013 - 3:33 pm

Chocolate Peppermint Cream Cheese Cupcakes - […] For recipe visit:  thecurvycarrot.com […]

Whole Wheat Cranberry Orange Scones


Ah, there’s nothing better than a freshly baked breakfast scone and a hot cup of coffee on a drizzly, gray day.  Especially with a Netflix Instant Queue, which happens to be jam-packed with a TV series you are trying to catch up on.

Huddled under an electric blanket, complete with one happy snuggly dog (Scout) and two purring, content cats (The Jinx and Cosmo) all packed like sardines on my couch, this was the beginning of my most recent weekend.  No plans, no obligations, no reason to venture out into the slushy Milwaukee weather.  The only thing I had to do was a mountain of two weeks’ worth of laundry and a kitchen to play around in.  And work out, which I did early, so it was out of the way and long forgotten.

And, so I made these little guys.  And while I have been limiting a lot of my carbs lately,  I didn’t (or, rather, couldn’t) give up an opportunity to try my hands at scones again.  They aren’t something that I necessarily go for, but it was the perfect day for a scone, if there ever was one.

I don’t have a lot of access to fresh fruit right now (see above comment about Milwaukee weather), but I did happen to have a bag of dried cranberries and a random orange, so this was swiftly converted into a more holiday-esque scone.  I loved the taste.  I put some aside in the freezer for another rainy day.  I also made a simple sugary glaze to up the sweetness factor (wasn’t too sure about the tartness potential here), but this is optional.


Whole Wheat Cranberry Orange Scones

Servings:  about 8 large scones


Ingredients

For the scones:

1 cup hot water

6 ounces dried cranberries

1 cup whole-grain flour (I used spelt flour, you can substitute whole wheat)

1 cup all-purpose flour

1 tablespoon baking powder

1/4 cup sugar

1/2 teaspoon salt

6 tablespoons unsalted butter, chilled, cut into 1″ pieces

3/4 cup whole milk ricotta (you could sub in a lower fat version as well)

1/3 cup heavy cream

Zest from one orange (or as much as you desire)

Decorating sugar (or turbinado sugar), optional

For the glaze (optional):

4 tablespoons powdered sugar

1-2 tablespoons water


Instructions

1. For the scones: Place the cranberries in the hot water and set aside for about 15-20 minutes, or until the cranberries have plumped up.  Drain the excess water.

2. Meanwhile, preheat the oven to 425 degrees and line a rimmed baking sheet with parchment paper.

3. In the bowl of your food processor (or you can also do this by hand, using a pastry cutter and a spoon), combine the spelt flour, all-purpose flour, baking powder, sugar, and salt, mixing well.

4. With the processor running (or using a pastry cutter), add the butter, one piece at a time, until the mixture resembles coarse sand.

5. Add the ricotta and heavy cream, mixing well.

6. Remove the dough from the food processor and transfer to a medium bowl.

7. Gently fold in the cranberries and the orange zest, mixing until just combined.

8. Transfer the dough to a clean, flat surface and pat the dough into a 1″-high disc.  At this point, you can cut the dough into any shape you like.  I used a 3.5″ round cookie cutter, reshaping and cutting out the dough until it was all used.

9. Lightly sprinkle the scones with decorating sugar, if using.

10. Baking until the scones are lightly golden, about 15 minutes or so.  ***Watch them carefully.  I found that I only had to bake mine for about 13 minutes in my particular oven.

11. Remove from the oven and let cool.

12. For the glaze, if using:  Whisk together the powdered sugar and water, adding more sugar or water until you reach your desired consistency.  Lightly drizzle each scone with the glaze and serve immediately.


Source:  Adapted from 101cookbooks, as originally adapted from The Smitten Kitchen Cookbook.

December 12, 2012 - 11:19 am

Mr. & Mrs. P - We are on a big cranberry kick lately!! We have to make these!

December 12, 2012 - 3:48 pm

Virginia - I love cranberry-orange scones in general, and now I’m craving these! Today is cold and rainy after a week of sunny and decidedly un-winter-like warm weather. Also, I love your ornament tree/topiary/cone in the background- so cute!

December 12, 2012 - 5:12 pm

srlacy - Thanks, Virginia! The topiary is from Target ($15, I think). I went a little overboard on decorations a couple of weeks ago…. 🙂

December 17, 2012 - 3:48 pm

a farmer in the dell - these sound fantastic! what a great Christmas morning breakfast. thanks for another lovely recipe!