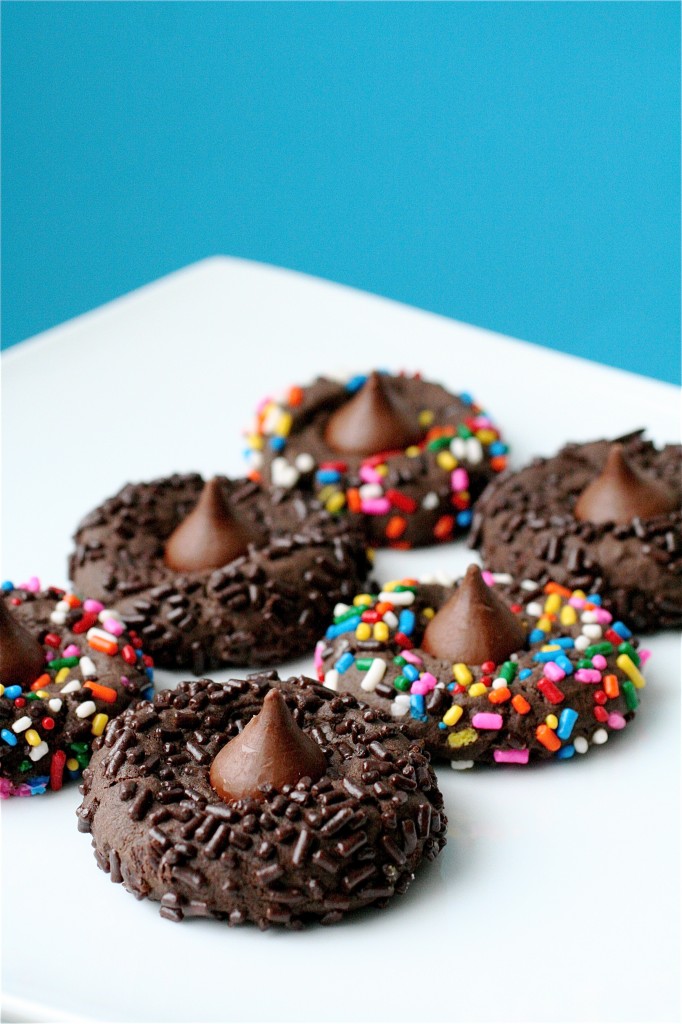
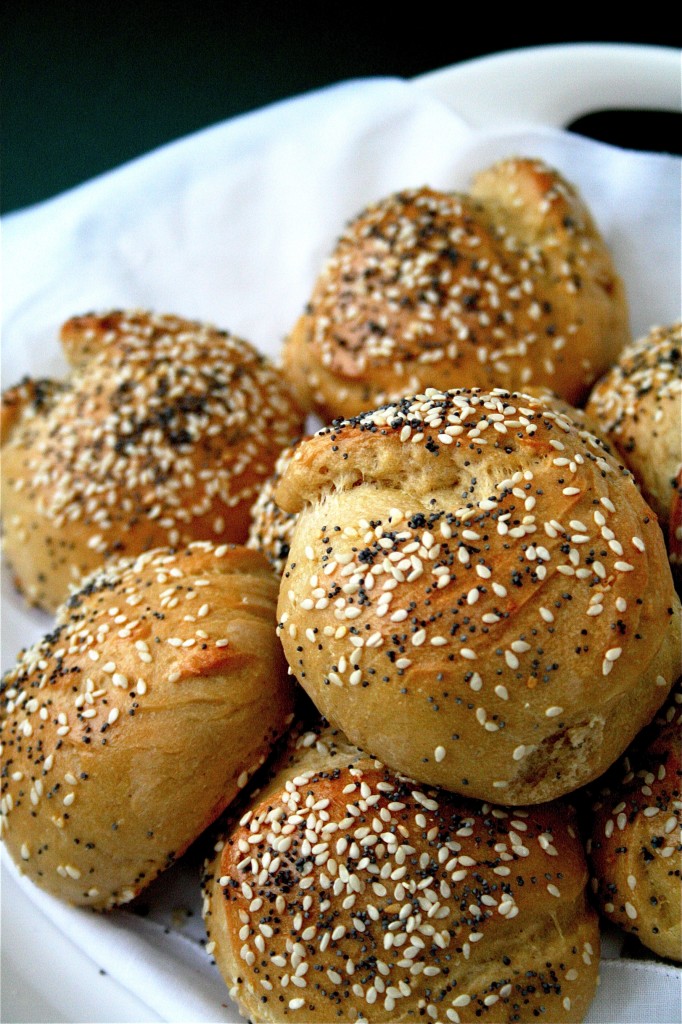
Chocolate Thumbprint Cookies

My little brother is a college hockey player in a neighboring state, who happened to break his arm pretty badly the other night during a game. I’ll spare you the details, but let’s just say it warranted a phone call to me at 1am from my extremely worried parents, who, thankfully happened to be at the game and were able to go with him to the hospital overnight.  They ended up bringing him back home for the weekend so he could rest and relax.  Since he’ll be out for the rest of the season, he’s pretty bummed.  So what’s a big sister to do?

Knowing that he loves sprinkles, I made him a giant batch of cookies (with sprinkles) to cheer him up.  Just a basic thumbprint cookie with extra dark cocoa and extra sprinkles.  He was surprised and laughed when he saw them the next day.  I also told him I would break the arm of the guy who caused his arm to break in the first place, but he just rolled his eyes and laughed.  Welcome to hockey, I guess.

Here’s to a speedy recovery, Ben (aka Fluff).  I love you and hope you feel better soon!

Chocolate Thumbprint Cookies

Servings: about 20 cookies

Ingredients

2/3 cup unsalted butter, softened

1/2 cup sugar

1/4 cup unsweetened dark cocoa powder

1/4 teaspoon baking soda

1/8 teaspoon salt

1 egg

1 teaspoon vanilla

1 and 1/4 cups all-purpose flour

3/4 cup chocolate or multicolor sprinkles (or both!!!)

20 (or however many cookies you end up with….) milk chocolate kisses, unwrapped

Instructions

1. Preheat oven to 375 degrees.  Line two cookie sheets with parchment paper.

2. In a large mixing bowl, beat butter on medium-high speed for 30 seconds.

3.  Add sugar, cocoa powder, baking soda, and salt.  Beat until combined, scraping the sides of the bowl occasionally.

4. Beat in egg and vanilla until combined.

5. Beat in the flour.

6.  Your dough should be at ball-rolling consistency at this point.  If it’s not, let it chill in the refrigerator for a while to firm up a little.

7. Once easily handled, roll dough into 1-inch balls.

8.  Roll balls in sprinkles to coat.

9. Place balls 2 inches apart on your lined cookie sheets, and, using your thumb, make an indentation in the center of each cookie.  (hence, thumbprint cookies…..:) )

10. Bake for 7 to 8 minutes or until edges are firm.  Immediately press a chocolate kiss into each cookie’s center.  Transfer to a wire rack and let cool.

Source:  The Ultimate Cookie Book.

January 16, 2011 - 8:01 am

Lauren at KeepItSweet - Hope your brother has an easy recovery! These look so pretty with the sprinkles.

January 16, 2011 - 9:30 am

Blog is the New Black - Sorry about your bro- I’m sure these helped. Anything with sprinkles is a bit more fun!

January 16, 2011 - 9:38 am

Julia - What cute cookies! I’m sure they cheered up your brother!

January 16, 2011 - 9:39 am

srlacy - Hey Julia! 🙂 🙂 🙂

January 16, 2011 - 10:39 am

Patty - You are such a sweet sister! Very cute cookies. Sending healing vibes little bro’s way. 🙂

January 16, 2011 - 3:46 pm

Aku - These look fabulous 🙂 Speedy recovery to your bro, sucks about being out for a season but hopefully a few of these helped with the disappointment!

January 16, 2011 - 4:03 pm

Rica - I never seen cookies like this before. looks so delicious. i’m bad in baking but i will try to make this. awesome pictures!

January 16, 2011 - 4:37 pm

Jane - Yummy! The sprinkles really brighten up the picture

January 16, 2011 - 4:56 pm

maggie - Great photos and website. You are a new discovery to me. Those cookies look amazing, yummy and have to make some!

January 16, 2011 - 5:19 pm

Vicki @ Wilde in the Kitchen - These are so adorable! I hope that your brother is on the mend soon, I’m sure he appreciated these cookies.

January 16, 2011 - 6:11 pm

Medeja - Cookies look so cute 🙂
I think it’s really nice way to cheer your brother 🙂 Hope he’ll recover soon

January 17, 2011 - 8:20 pm

Medifast Coupon - These cookies would make anyone feel better! Perfect little drops of sprinkles and chocolate always help with recovery. Cute pictures!

January 17, 2011 - 10:20 pm

Ann - These are beautiful cookies. What a great sister.

January 18, 2011 - 3:39 am

cakewhiz - Congrats on the top 9. Your cookies look beautiful. So colorful with all those sprinkles 🙂

January 18, 2011 - 4:38 am

Jenny Nguyen - they look just adorable! well done 🙂

January 18, 2011 - 9:03 am

Trish @I_am_Succeeding - Sooooo yummy!!

January 18, 2011 - 9:10 am

Kori - What a great “get well” gift! These are ADORABLE. I love the sprinkles idea…totally saving this for the next time I make thumbprint cookies. Also, I can see these as witch hats with different colored sprinkles for Halloween. So cute!

January 18, 2011 - 11:19 am

Kim - Liv Life - What a wonderful sister you are!! I love it that your brother loves sprinkles. My daughter usually eats all of ours before we actually get to use them, but she would love these cookies as well. We’ve bookmarked for a day when we have sprinkles on hand!
Our best good luck wishes to your brother… I know it’s hard to sit on the sidelines…
Congrats on the well deserved Top 9!

January 18, 2011 - 11:27 am

Amanda @ bakingwithoutabox - What a sweet sister present! I’m sure the colorful sprinkles totally helped with the arm. My hurts always feel better with chocolate. Those are very cute cookies. Congrats on Top 9!

January 18, 2011 - 12:22 pm

ceecee - These cookies are adorable – they look like donuts with a “kiss”.

January 18, 2011 - 12:33 pm

Fresh and Foodie - BEAUTIFUL photos! I love the colors. I also love thumbprint cookies — great job all around!

January 18, 2011 - 1:41 pm

briarrose - What a great get well gift. 😉 These look precious. Sprinkles always make things better.

January 18, 2011 - 2:11 pm

natalie (the sweets life) - these are cute! I’d love to make some in February with Valentine’s Day sprinkles!!

January 18, 2011 - 3:03 pm

Claudie - Simply beautiful!

January 18, 2011 - 4:45 pm

Lisa @ tarte du jour - Such fun cookies…..what a nice sister! You photo is gorgeous…..those cookies draw me in!

January 18, 2011 - 6:18 pm

Lexibule - Qu’est-ce qu’ils sont beaux!! Mes enfants vont adorés:)) Merci! J’imprime ta recette et j’essaierai très prochainement!! En passant tu as un talent incroyable, que de bonnes choses par ici;)xxx

January 18, 2011 - 6:22 pm

Denine Regan - These are awesome! I love thumbprint cookies and will happily chow down on these! Great pic too!

January 18, 2011 - 9:00 pm

Taylor - My little brother plays sports too so I know what its like watching and just praying he doesn’t get hurt! Hope your brother recovers well. p.s. these cookies are adorable!

January 18, 2011 - 10:34 pm

Claire - I’m so happy you made Foodbuzz!

February 23, 2011 - 9:40 pm

Tina W - I made these for my youth group for Valentine’s Day–easy, cute, delicious! Thanks for the inspiration!

March 24, 2011 - 8:01 pm

(what runs) Lori - Wow. TEACH ME. Your photos are incredible! The colors! The “art” of it! What’s your secret…??

oh and of course the food looks amazing!

March 24, 2011 - 8:22 pm

srlacy - Oh wow. Thanks, Lori. You just officially made my day.

I try to think of one thing that epitomizes the food. Whether it’s a yellow sprinkle, a “hair” on a raspberry, or a swirl of piped frosting, I try to focus on that. No distracting foregrounds/backgrounds. It’s just the food.

I’m having a love affair with food. 🙂

July 15, 2011 - 5:32 am

Chocolate Kiss Cookies » With Sprinkles on Top - […] Kiss Cookies Recipe source: The Curvy Carrot Print […]

July 18, 2011 - 2:18 pm

How sweet it is to be in love with you | she cooks, he eats - […] Thumbprint Cookies (recipe here) Chocolate Thumbprint Cookies || photo […]

August 2, 2011 - 10:05 am

chocolate thumbprint cookies | she cooks, he eats - […] Chocolate Thumbprint Cookies (from The Curvy Carrot) […]

December 12, 2011 - 7:55 am

Chocolate Snowball Cookies « Cate's World Kitchen - […] Recipe Plugin1.3http://catesworldkitchen.com/2011/12/chocolate-snowball-cookies/ (adapted from The Curvy Carrot) var linkwithin_site_id = 40770; (function () { var elem = document.createElement('script'); […]

January 7, 2012 - 10:50 pm

Molly - I tested out your recipe and loved it! Thanks for the idea…and the Sugar Rush!

March 25, 2012 - 9:44 pm

Weekly Recap – 3/19 – 3/25 | Cinnamon Bubbles - […] Chocolate Thumbprint Cookies by The Curvy Carrot […]

March 28, 2012 - 5:00 am

The Curvy Carrot » Chocolate Thumbprint Nests - […] chocolate cookie recipe (my favorite chocolate cookie recipe, in fact) which I have used before in THIS post and a combine it with a spring-time classic kiddo treat (which apparently adults love, too, […]

April 22, 2012 - 1:15 pm

AliLily - Scrumptious List of Desserts for Kayli’s Birthday - […] Chocolate Thumbprint Cookies from The Curvy Carrot.  […]

August 23, 2012 - 11:59 am

Andrea@Hearthside Gatherings - Found this on Pinterest…these look great! I’ll have to try them!

November 8, 2012 - 10:44 pm

Kelly - These look fabulous! I want to make them, but I also want to print out the recipe. Am I missing the “print friendly” button? Help!

November 9, 2012 - 12:11 am

srlacy - Hi Kelly-

Right now the template I am using does not offer a “print” button (unfortunately-I’ve tried messing with it, but it won’t let me.) For now, you can copy and paste into Word without printing out all the pictures.

December 20, 2012 - 4:54 pm

Morgan - Just made these today and they are delicious! I’ll definitely be checking out more of your recipes.

December 21, 2012 - 6:13 pm

Tammy - Just made these. They are really tasty and very pretty. They will look great on the cookie try when we open our gifts with family this weekend. Made 31 cookies

March 2, 2013 - 8:29 am

Annika - I have a batch of these in the oven right now and they smell really good! I got my little 7 year old brother to help me with rolling them in the sprinkles and making the thumbprints as well- they’re fun to make with kids and I can’t wait to try one! 🙂

April 12, 2013 - 10:01 am

101 Desserts using Hershey Kisses - Something Swanky - […] Colorful Chocolate Thumbprints […]

July 15, 2013 - 9:28 am

Top 10 Chocolate Recipes - […] Recipe […]

December 23, 2013 - 1:22 pm

Chocolate Thumbprint Cookies | - […]  Add sugar, cocoa powder, baking soda, and salt.  Beat until combined, scraping the sides of the bowl […]

January 6, 2014 - 10:35 am

Caramel Egg(cellent) Chocolate Thumbprint Cookies | My Midwest Table - […] Caramel Egg(cellent) Chocolate Thumbprint Cookies Adapted from: The Curvy Carrot […]

February 2, 2014 - 1:07 pm

Adventures In Pinterest: Baking, of course - Mama Bub - […] month I tackled pins that were calling my name. First up, Chocolate Sprinkle Thumbprint Cookies. These were easy, and yummy. I eliminated the rolling step by using my small cookie scoop and […]

April 6, 2014 - 6:06 pm

Top 10 Chocolate Recipes - […] via thecurvycarrot.com […]

September 13, 2014 - 7:00 pm

Mouthwatering Chocolate Recipes • Dangling MouseDangling Mouse - […] almost bite-sized nibbles are what makes the world an amazing place to live in.  Imagine how much of these could you possibly […]

September 17, 2014 - 1:38 am
December 7, 2014 - 6:43 pm

erica - Mine were too wet/sticky to ball…I added extra flour and made two logs wrapped in Saran wrap and stuck in the fridge to hopefully set up some…
I doubled the recipe too…so I wonder if it was operator error…My math. We’ll see .
I’m sure they will be fine…can’t wait to roll them in sprinkles!

December 8, 2014 - 9:39 pm

erica - Well I just took them out of the fridge and baked…and they turned out super cute!
Will definitely be making more of these!!
Thank you for sharing this recipe…!!!

December 11, 2014 - 1:34 pm

25 Hershey’s Kisses Recipes That’ll Get You Chocolate Wasted | News & Stuff - […] Chocolate Thumbprint Cookies The Curvy Carrot Get the Chocolate Thumbprint Cookies recipe by The Curvy […]

December 22, 2014 - 12:48 am
December 22, 2014 - 5:02 am

It's a Holiday Baking Extravaganza | Leah's Thoughts - […] Chocolate Thumbprint Cookies […]

January 24, 2015 - 4:38 pm

laurab - These are wonderful! A great basic chocolate cookie, easy to make with kids, and a great jumping off point for all sorts of fun decorating ideas! Thank you!

Basic Sandwich Rolls

I almost did it.  I stood in the bread aisle at my local grocery store with a bag of store-bought buns in my hands, since I had plans to make these amazing veggie burgers for dinner that night (I will post them eventually…).  Deep down, I had told myself that I wanted a full-on challenge: I would make an entire meal from scratch, without help.  Now, I have nothing personal against store-bought hamburger/sandwich buns.  Well, ok.  I kind of do.   I don’t like that powdery stuff on the bottoms of the buns (I think it’s probably flour, but you never know….).  And, while I like them, the all-white ones are not very flavorful in my opinion.  And, I like to put a lot of condiments on my sandwiches sometimes….which means that they usually get kind of soggy.

Ok, ok.  My mini rant about generic store-brand hamburger buns is over.  They are also great when you are low on time, easy on your budget, and they make great croutons later on.  However, I figured since I had the time to actually try making some of these on my own, I would try to use some more natural ingredients and see where that took me.

I’m so glad I tried this recipe.  Now, I know not everyone has three hours of their day to devote to making hamburger or sandwich rolls, but, if you do, you can freeze the ones you don’t eat up and save for later.  Which is, in fact, good for when you are low on time, on a budget, and in need for some hearty croutons.  And these have amazing flavor, too.  Oh, and if you want a vegan version, I’ve included some of the recommended substitutions as well.

Basic Sandwich Rolls

Servings: 10 rolls

Ingredients

For the rolls:

1 cup warm milk or rice milk

1/2 cup warm water

2 and 1/4 teaspoons (1 package) active dry yeast

1/4 cup olive oil, plus more for the dough bowl

1 tablespoon honey or 2 teaspoons agave nectar

2 and 1/2 teaspoons salt

1 and 1/2 to 2 and 1/2 cups all-purpose flour

1 cup whole wheat flour

1/2 cup oat flour

For the egg wash:

1 beaten egg plus 1 tablespoon whole milk

-or-

2 tablespoons soy milk plus 1/2 teaspoon cornstarch

For garnish:

Poppy seeds, sesame seeds, wheat bran, flax seeds, or any combination

Instructions

1.  In a small bowl, stir together the warm milk and water.

2. Whisk in the yeast and let stand for about 5 minutes, until the yeast begins to foam.

3. Whisk in the oil and honey.

4. In a large bowl (just use your removable bowl from your stand mixer for this), whisk together 1 cup of the all-purpose flour, the whole wheat flour, oat flour, and salt, and add the yeast mixture.

5. In a stand mixer fitted with the paddle attachment, stir the dough until combined, about 2 minutes.

6. Switch to the dough hook and knead until smooth and elastic, 8 to 10 minutes, cautiously adding more flour as needed.  Loosely shape the dough into a round.

7.  Pour 1 teaspoon or so of olive oil into the mixing bowl and coat the dough with it.

8.  Cover the bowl with a piece of plastic wrap or towel and let stand in a warm place until doubled in size, 1 to 2 hours.

9. Turn the dough onto a work surface and shape into 10 rolls.

10.  Space the rolls 3 to 4 inches apart on a parchment-lined baking sheet.

11.  Cover again with plastic wrap or a towel.  Let stand in a warm place until doubled in size, 1 to 2 hours.

12.  Preheat the oven to 400 degrees.  Meanwhile, prepare your egg wash in a separate bowl by mixing the egg and milk together.

13. Brush the rolls with the egg wash and sprinkle with your seed garnish, being sure to cover the rolls as much as possible.

14. Bake for 15 to 18 minutes, turning the pan halfway through.

15.  The rolls are done when the base is browned.  Cool completely.

Source: Veggie Burgers Every Which Way by Lukas Volger

January 14, 2011 - 7:03 am

Blog is the New Black - Looks excellent. I haven’t come far enough to make my own sandwich rolls, but I can only imagine how much better they taste!

January 14, 2011 - 7:51 am

Tiffany @ Conor & Bella - I love making homemade buns! So much better than store-bought. Thanks for the recipe!

January 14, 2011 - 8:18 am

notyet100 - wow,i feel like pickingone,..

January 14, 2011 - 11:02 am

Patty - These look and sound sooo much better than store-bouught. Love how you can alter the recipe for special diets too!

January 15, 2011 - 12:25 pm

Aku - These look and sound great Shanon. I am a major homemade bread convert–it is so worth the time it takes and the results are always totally incomparable in relation to shop-bought. Now if only I didn’t have to work so I had time to do it more often!

January 18, 2011 - 9:19 am

Rich - Ha – I’ve convinced myself a hundred times that I’m going to make my own sandwich rolls, and I never do – nice job on following through! These look fantastic, and I’m sure they tasted great, too …

January 25, 2011 - 12:26 pm

Mary Beth - I’m going to try these this afternoon. Unfortunately my store was out of oat flour, but I’ve been told you can make your own by putting rolled oats in the food processor. Do you think it will work?

January 25, 2011 - 12:59 pm

srlacy - Mary Beth-

All I can say is try it and see what happens. I know when I have needed almond flour in the past, I have ground them up in the food processor with no problems.

Let me know how they turn out!

Shanon

January 25, 2011 - 6:50 pm

Mary Beth - It worked! I ground it as finely as I could in my food processor, but it wasn’t as powdery as regular flour. I ended up adding the full 2 1/2 cups of all purpose flour, not sure if the texture of my ‘oat flour’ had anything to do with that. The end result was delicious! Served it with pulled pork and sauteed peppers and pepper jack cheese melted on top. Can we ever go back to store bought buns? 🙂

January 25, 2011 - 7:12 pm

srlacy - Yay! I’m so glad. I will take note of that for next time! Thanks for sharing!

March 6, 2011 - 5:07 am

The Curvy Carrot » Black Bean Burgers - […] recipe.  I was sold.  I have now made at  least four recipes out of this book, including the Basic Sandwich Rolls, and I have not been disappointed yet.  (And, no, I do not have any connection whatsoever with the […]

May 18, 2011 - 2:25 pm

Winnie - Love this rolls!
Great post

August 15, 2011 - 5:02 am

The Curvy Carrot » Summer Squash Veggie Sloppy Joes - […] hamburger buns or focaccia rolls, […]

October 17, 2011 - 9:30 am

Kneading is Necessary | Falling for Food - […] found this recipe on The Curvy Carrot. I liked that the rolls used whole wheat flour and they looked delicious. And, […]

October 27, 2012 - 4:29 am

Rolls with seeds « Julienne - […] adapted from The Curvy Carrot Share this:FacebookPinterestVind ik leuk:LikeWees de eerste die dit leuk […]

November 9, 2012 - 6:28 am

Rolls with seeds | Julienne - […] Source: adapted from The Curvy Carrot […]

Ad Hoc Brownies

Do I even really need to write up a post about these?  Just look at them.

Over the holidays, I went through some major chocolate cravings.  Like, deeply serious ones.  I remembered that I had saved this recipe for the one guiltless baking extravaganza that would come at the proper time.  Well, it seems that lately, I have had a lot of those “I need some freaking chocolate NOW” moments. And, so, I pulled out the big guns with this recipe.

Now, I will draw your attention to one simple fact about this recipe: yes, 3 sticks of butter.  There, I got it out there.  So, before I get some comments about how horrible I am for posting these during New Year’s resolutions, let me explain that these brownies are the best brownies that I have ever had in my life (so, for me, SO worth the extra exercise).  They are plain jane-no nuts, no frosting, no special add-ins.  Because?  Because they don’t need any brownie “flair”.  They are, simply, understated and incredible at the same time.  LOVE. THEM.  Deeply rich and velvety with a light dusting of powdered sugar, tiny bits of bittersweet chocolate mixed in the batter, and a cold glass of milk on the side.  Are you in?  Because if you can agree that everything is allowable in moderation, then I promise you that you will satisfy any chocolate craving with these amazing kings of the brownie world. (especially if served warm over some vanilla ice cream……)

Ad Hoc Brownies

Servings: 12 brownies

Ingredients

3/4 cup all-purpose flour

1 cup unsweetened alkalized cocoa powder

1 teaspoon kosher salt

3/4 pound (3 sticks, yes, I know…..) unsalted butter, cut into 1-tablespoon pieces

3 large eggs

1 and 3/4 cups granulated sugar

1/2 teaspoon vanilla paste or pure vanilla extract

6 ounces 61-64% chocolate (I used Ghiradelli brand bittersweet chocolate chips), chopped into chip-sized pieces (about 1 and 1/2 cups)

Powdered sugar for dusting

Instructions

1. Preheat the oven to 350 degrees.

2. Butter and flour a 9-inch square metal or glass baking pan.

3. Sift together the flour, cocoa powder, and salt; set aside.

4. Melt half of the butter in a small saucepan over medium heat, stirring occasionally.

5. Put the remaining butter in a medium bowl, and pour the melted butter over the top of it.  (This will bring the butter to room temperature.)

6. In the bowl of a stand mixer fitted with the paddle, mix together the eggs and sugar on medium speed for about 3 minutes, or until thick and very pale.

7. Mix in the vanilla.

8. On low speed, add about one-third of the dry ingredients, then add one-third of the butter, and continue alternating the remaining flour and butter.

9.  Add the chocolate and mix to combine.

10.  Spread the batter evenly in the pan, and bake for 40 to 45 minutes or until a cake tester or wooden skewer poked into the center comes out with just a few moist crumbs sticking to it.

11.  Cool in the pan until the brownie is just a bit warmer than room temperature.

12. Run a knife around the edges and invert the brownie onto a cutting board.  Cut into 12 rectangles.

13.  Dust the tops with powdered sugar just before serving.

Source: Ad Hoc at Home by Thomas Keller

And, I would like to sincerely thank Amalia, from ButterSweetMelody, for giving me the Stylish Blogger Award!  I am so thankful to have been included in her list of favorite blogs.

Part of this award allows me to recognize MY 15 favorite foodie blogs and spread the blogging love more!  I have met so many incredible people through this ever-growing part of the internet, and I would just like to send some love to the people who I know are regular readers of The Curvy Carrot and/or who have blogs that I completely admire (and haven’t already been given this award-a lot of you out there have!). In no particular order, I give the Stylish Blogger Award to the following blogs:

Annie (of course) at Annie’s Eats

Jenny at Strung By Color (check out her crafts and Foodie Fridays!)

Natalie at TheSweetsLife

Kim at Liv Life

Josie at Pink Parsley

Ali at gimmesomeoven

Leslie at LeslieSarna

Carolyn at All Day I Dream About Food

Georgia at The Comfort of Cooking

Courtney at Cook Like A Champion

Jacob at Jacob’s Kitchen

Lauren at Foodie House

Patty and Crispin at Baking is Hot

Rachel at MuffinEgg

Aku at The Cloud and the Kitchen

I am apparently supposed to tell you 7 things about myself (that’s me in the middle, flanked on my right by my little sister, Sammy, and her boyfriend, Andy):

1. I am left-handed.  Does that make me right-brained?  I don’t know.

2.  My mom actually spelled my name “wrong” on the birth certificate-hence only one ‘n’ in Shanon.

3.  I am moving to New England in 6 months, found an apartment online, and successfully signed a lease 2 weeks ago-so excited!

4. I have a black cat named Jinx.

5. I can wiggle my ears.

6. My favorite movie is the 1986 Jim Henson classic, The Labyrinth.  Yes, I actually just published that.

7. I have technically been in training/school for 27 years now.  Next year is my last year before I get my real grown-up job. HECK YEAH!
January 12, 2011 - 6:21 am

Lauren at KeepItSweet - If you say these are the best brownies, I am definitely trying them! I bet that using a combination of cocoa powder and chocolate has a major impact.

January 12, 2011 - 8:08 am

georgia - Yes Lauren they are great brownies! I ate every last crumb!!

January 12, 2011 - 8:09 am

Blog is the New Black - Gorgeous pics, great recipe. Where in NE are you moving?! I am a Bostonian!

January 12, 2011 - 8:19 am

srlacy - Liz-

I’m going to New Hampshire to finish up at Dartmouth next year! I am so excited. One of my best friends is in Boston, and he loves it so far. I’m hoping to visit him when I’m out there!

January 12, 2011 - 8:20 am

Tiffany @ Conor & Bella - Oh my gosh those brownies. !!!

January 12, 2011 - 10:29 am

Patty - Congrats on the award – much deserved! Thanks so much for the kind mention too. 🙂

These brownies sounds incredible. I agree with you – moderation is the key!

January 12, 2011 - 10:50 am

Aku - Oooh you just made my heart jump a little! Thanks for sending some food blog lovin’ my way 🙂 My most recent post is brownies too–I had to satisfy an all-consuming chocolate craving last night with storecupboard ingredients (ie no actual chocolate) and they totally hit the spot. Will try yours next time though!

January 12, 2011 - 12:14 pm

Chef Dennis - Hi Shanon
Congrats on a much deserved award!! You certainly picked a great bunch of bloggers to give it too, they are all my favorites!
Thanks for sharing so much about you, my wife is a lefty and she is always setting the table backwards…lol…
I love Labyrinth, one of Bowie’s best roles! and I can wiggle my ears too, it really freaks people out!
Now those brownies my dear……oh how I wish I had a few right now, they look delicious!
Cheers
Dennis

January 12, 2011 - 4:37 pm

Courtney - Aw, thanks so much for mentioning me! 🙂 I really love The Labyrinth, too. I actually have the song Magic Dance on my iTunes playlist.

Also, those brownies look out of this world delicious! I can’t wait to try them!

January 13, 2011 - 6:18 am

fooddreamer (Carolyn) - Wow, thanks so much for passing on the award, I am honoured! I like “Shanon” with juse one n, it’s very elegant. And the brownies aren’t exactly elegant but they look delicious!
I always joke to my husband that one of my favourite cookbooks should actually be called “12 Tablespoons of Butter” because almost every recipe seems to take that amount. But 3 sticks, wowza! My kind of brownie.

January 13, 2011 - 4:46 pm

Jacob's Kitchen - (Blush)

I am so flattered. One, because your blog is always so lovely. You definitely give us (relative) newbies something to aspire to. And two to be among such other great bloggers that you named above (all of whom I also visit, admire, and draw inspiration from) =) So thank you! It is much appreciated.

These brownies look amazing. I almost need a glass of milk just to wash down the photos. I love how little flour they call for. I mean, who doesn’t love a nice fudgey brownie? Perfection. Nicely done. =)

Cheers!

January 13, 2011 - 10:19 pm

Kim - Liv Life - For the “best brownies ever” 3 sticks of butter is totally calorie-worthy! Your pictures said it all, and if I hadn’t just eaten the rest of our ice cream I’d be whipping up a batch of these!
Thank you so much for the award! I was so surprised to see my name there. You absolutely made my day!
Congrats on your award as well, stylish is the perfect word for you blog. Nicely done!

January 13, 2011 - 11:11 pm

Josie - These brownies look amazing – I thumbed through Ad Hoc at Home last time I was at Barnes and Noble, and I’m kicking myself for not buying it!
Also, thanks for the mention – your blog is pretty fabulous as well, and is quickly becoming one of my favorites!

January 14, 2011 - 3:18 pm

Claire - Congratulations! I can soooo relate to the 23+ years of being in school and training.

January 16, 2011 - 12:17 am

Kendra - This was the first recipe I made out of Ad Hoc at Home! I stared at the three sticks of butter line for awhile before taking the plunge, but so so so worth it! And rich so it does satisfy that craving with just a little square!

January 19, 2011 - 3:47 pm

Jenny @ StrungByColor - Awww thanks for the shout-out, Shan! SO nice of you. I actually do the Foodie Fridays on the Boling blog…but I love the traffic you generated on StrungByColor. Hopefully food blog followers also like crafting and handmade accessories! 🙂

January 19, 2011 - 3:50 pm

srlacy - Yep I totally realized that after I posted it. Oooooppps. 😉

January 19, 2011 - 10:23 pm

natalie (the sweets life) - thanks for the award, you’re so sweet and your blog is one of my faves. why? well, these brownies for one 🙂

February 8, 2011 - 9:01 pm

Jacqueline - I made these today and I don’t know where I went wrong!
The batter seemed to be all separated liquid butter. It then bubbled to the top and left me with a buttery mess. Was the butter all supposed to be melted or semi-solid?

Thanks!

February 8, 2011 - 9:20 pm

srlacy - Hmmm, Jacqueline.

When I made them, the half melted butter and the half solid butter left me with a semi-solid mixture. I have noticed that sometimes salted butter will do the bubbling thing. Overall, though, when you combine the two butter mixtures, it should not be liquid. I hope they still tasted ok!

February 9, 2011 - 6:03 am

Jacqueline - Where I live unsalted butter is impossible to find, so I skipped the additional salt.
We’re not discouraged though LOL we are making them again today!