These are for one of my best friends, Annie.
I was so excited to be asked to be a part of her “virtual” baby shower. What a great idea! Annie is a celebrity in the food blogging world, and, of course, she has many friends and supporters in “virtual” kitchens all over the world. Why shouldn’t she have an amazing baby shower and share the joy of her soon-to-be little girl with the rest of us out in the blog world?
Now, I know how excited Annie and Ben are for this new little one. And I love Annie’s stories of Andrew (soon-to-be big brother) patting her tummy and talking to his little sister. I cannot wait to meet this little one. I can only imagine how beautiful this baby will be. And you better believe that I will be the first one to bring Annie her favorite sushi rolls and a bottle of wine after she has the baby!!!
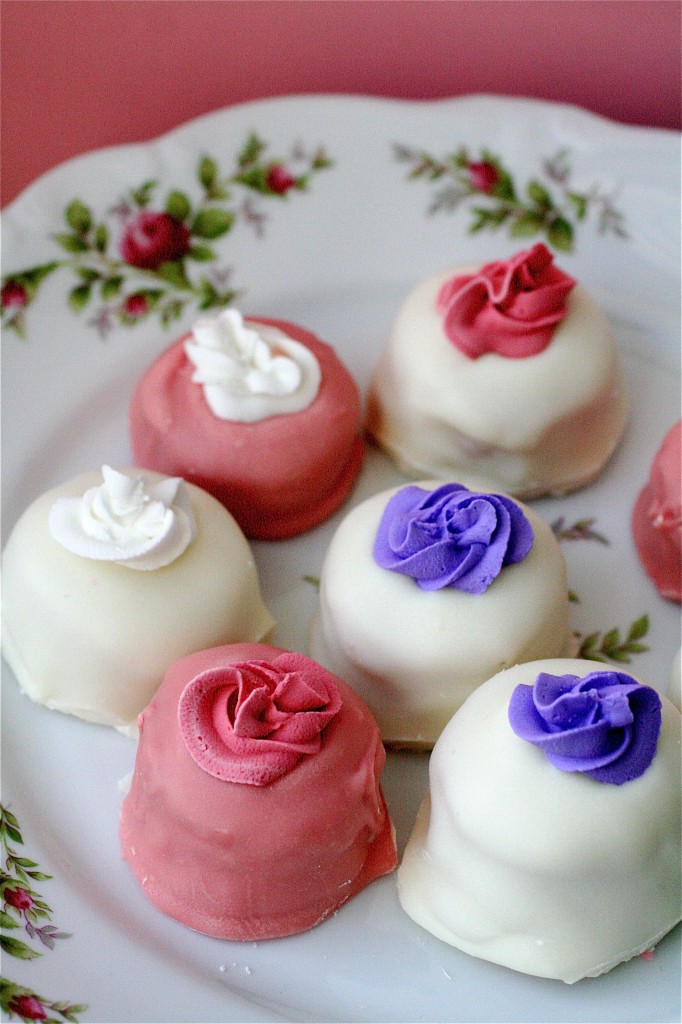
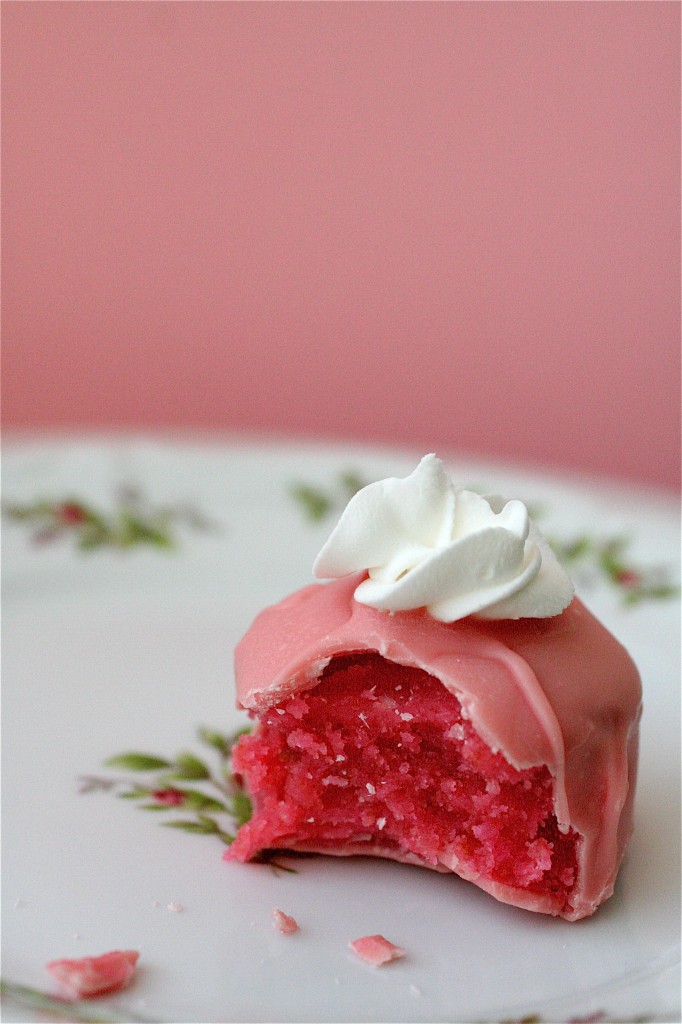
When we were asked which type of food object we were going to “bring” to the shower, I immediately thought of these. Annie loves red velvet cake, so it seemed fitting that I would try a pink version of velvet cake-especially for a little girl. I was inspired by Bakerella’s cake balls for this one. And, I actually found it was difficult to find a pink velvet cake recipe. I was a little hesitant to play around with the recipe I found because I had never made this version before, so I stuck very closely with the original. (Which ended up being a good idea, because the original recipe is AWESOME!). I knew I wanted a cream cheese frosting binder to mold the cakes, and I went with what I believe to be the King of Cream Cheese Frostings-the Martha Stewart cream cheese buttercream frosting. I found the candy melts at my local craft store, and they were a cinch to dip the cakes in. The royal icing “rosettes” were the most fun part. I am horrible at piping (when I have time, I WILL take a decorating class), so I just kind of winged it. They were a little abstract, but I actually ended up really liking the design.
I packed Annie a pretty box tied with a pink ribbon and gave them to her at work. I had a few leftovers, so the next day I brought in the rest for my co-workers because I couldn’t stop eating them at home. Everyone really seemed to like them-which made me very happy.
I’m so proud to be a part of this virtual baby shower today. But I am even more proud of Annie. She’s the kind of woman who just glows with pregnancy, and, even though she has major heartburn and pitting edema in her flats at work, she’s so happy and content with this little one, and I am so blessed to be a peripheral part of it. I know how much this means to her! Love you, girl!
To see the official round-up of this “virtual baby shower” and what the rest of the group brought to the shower, please visit Courtney at Cook Like a Champion (the hostess with the mostest!) and/or Annie’s Eats.
Pink Velvet Cake Truffles
Servings: Approximately 45-50 truffles, depending on the cookie cutter you use
Ingredients:
For the pink velvet cake:
8 ounces white chocolate (*This is two baking bars. I used Ghiradelli.)
1/4 cup heavy cream
2 and 1/4 cups all purpose flour
2 and 1/4 teaspoons baking powder
1/4 teaspoon salt
10 tablespoons unsalted butter, room temperature
1 1/3 cups sugar
4 large eggs
1 teaspoon vanilla extract
1/4 teaspoon almond extract
1 cup half and half
Rose or pink gel food coloring (*I used Wilton’s “rose petal pink” and then added some Wilton’s “rose” color to make a deeper pink color.)
For the cream cheese frosting: ****I did not use the whole batch of frosting. I ended up using the leftovers (which was about half) for mini cupcakes (post to follow soon). If you don’t want leftover frosting, I recommend dividing this in half.
1 cup (2 sticks) unsalted butter, room temperature
12 ounces cream cheese, room temperature
4 cups powdered (confectioners’) sugar
3/4 teaspoon pure vanilla extract
Rose or pink gel food coloring, to desired tint
For the decor:
2 14-ounce bags of pink-colored candy melts (*I used Wilton brand)
2 14-ounce bags of white-colored candy melts
One batch of Royal Icing, divided and colored with desired food coloring gels
Instructions
1. For the cake: Preheat the oven to 375 degrees.
2. Butter and flour one sheet cake pan. I used a 13″ x 8″ metallic pan. Honestly, though, use whatever you have. It will not matter in the end.
3. Bring 1/4 cup cream to a simmer in a medium saucepan over medium low heat. Do not boil.
4. Add the white chocolate, remove from heat, and stir until melted and smooth. Set aside.
5. In a medium bowl, combine the flour, baking powder, and salt. Set aside.
6. In a standing mixer fitted with the paddle attachment, beat the butter until fluffy.
7. Add the sugar slowly, beating well, about 2-3 minutes.
8. Add the eggs, one at a time, beating well after each addition.
9. Add the extracts and coloring and beat until well blended until smooth and of the desired color.
10. Reduce the mixer speed to low, and add the flour mixture in thirds, alternating with the half and half.
11. Add the melted chocolate mixture to the bowl, beating well until combined.
12. Spread the batter evenly in your prepared cake pan and bake for about 30 minutes or so, or until a cake tester inserted in the center comes out clean.
13. Cool in pan for 10 minutes.
14. Invert the pan to remove the cake and let cool completely on a wire rack.
15. For the cream cheese frosting: With a standing mixer on medium-high speed, beat the butter and cream cheese until fluffy, about 2-3 minutes.
16. Reduce mixer speed to low and add the sugar gradually, and mix until smooth, scraping down the sides of the bowl as needed.
17. Add vanilla and mix well.
18. Add desired food color gel and mix to desired tint. Set aside. ***The frosting and cake can be made ahead of time and refrigerated up to 3 days ahead of time.
19. To assemble the cake truffle: In a large bowl, crumble the cake between your fingers to break the cake apart.
20. Add frosting (at room temperature) about 1/2 cup at a time, mixing well with your hands, until the cake forms a nice doughy ball. You will need the consistency of a bread dough, because you will roll it out eventually. As I said before, I only used about half of the above frosting recipe to get the consistency I needed.
21. On a lightly floured surface, roll the frosting/cake mixture out with a rolling pin to your desired thickness. I rolled mine out to 3/4″ thickness.
22. With your desired cookie cutter shape (I used a 2-inch round cookie cutter), cut out your shapes, reshaping and re-rolling out your dough as needed.
23. Place the cut-out shapes on a parchment-lined baking sheet, and refrigerate until firm (or overnight).
24. For the decor: The royal icing “rosettes” are the next step. I used a Wilton #4 pastry tip.
25. Divide your royal icing into lidded airtight containers and color as desired.
26. Fill your various pastry bags with the royal icing and attach the Wilton #4 tip to the bags.
27. On several sheets of parchment paper, pipe out using a quick left-to-right motion to form basic rosettes. Play around with this. Yours will probably look a lot better than mine, and I made tons of extra. You will have plenty of royal icing to play with.
28. Once finished, let the rosettes harden on the parchment paper, at least 4 hours (or overnight).
29. For the candy melts: Place a heatproof bowl over a saucepan of gently simmering water on the stove.
30. Add the candy melts to the bowl and stir frequently, until smooth and creamy.
31. Once melted completely, dip each little cake completely into the warm melted chocolate, covering completely and working quickly.
32. Set each cake back down on the parchment-lined baking sheet and quickly add one royal icing rosette to the top. (***Keep one hand “dry”, and one hand “candy melt coated”, washing your hands frequently to remove excess hardened candy melt).
33. Cover half of the cakes with pink candy melt coating.
34. Repeat with the remaining half of the cakes with the white candy melts and rosettes.
35. Refrigerate the cakes overnight. The next day, you can use a small paring knife to cut around the cakes and remove the excess “drippy” candy coating to produce a more uniform shape.
Enjoy!

Sources: Overall inspiration from Bakerella; pink velvet cake directly from Restless Chipotle; Cream Cheese Frosting from Martha Stewart’s Cupcakes


.jpg)


Strawberry Champagne Ruffle Cake for a Virtual Baby Shower – Cook Like a Champion - […] from The Curvy Carrot made bite-size pink velvet cake truffles with candy coating and the cutest royal icing rosettes. […]
Virtual Baby Shower » Annie's Eats - […] of Curvy Carrot made these dainty little pink velvet cake truffles. Shanon is one of my best friends in real life, as well as a talented blogger herself. Since […]
Jessica - These look delicious! Perfect for a bridal shower! 🙂
branny - These little truffles are so perfect for a shower.
Thanks for visiting my blog and leaving a comment. I’m shocked at how many “blogger-friends” we have in common; I am surprised I haven’t run into your site sooner. I’ll be returning for sure. Happy Shower to Annie.
Annie - I love you to pieces, Shanon. You are such a wonderful friend and I am looking forward to you meeting baby Caroline – as well as the sushi and wine post-baby 🙂 I am so lucky to have a friend like you.
Blog is the New Black - Stunning! Great “gift!”
Josie - So cute and girly – what a perfect contribution!
Maggie - I found your blog via Annie’s Eats and these Cake Truffles are so pretty!! Definitely going to make them for an upcoming wedding shower.
Marye - I LOVE these! Thanks for the linky love. 🙂 so glad you liked this cake. I developed it because I just couldn’t find a pink velvet with the flavor I was looking for rather than a bland version of red velvet or just a white cake with pink food color!!!
srlacy - Marye-
They were SO good. In fact, it just might be my favorite cake, EVER! I kept coming back to your recipe and knew that it would be fantastic! And I love your sense of humor, too. You are a joy to read!
Shanon 🙂
Lauren at KeepItSweet - Your truffles look gorgeous!!!
elly - These look absolutely gorgeous and sound delicious! I’m a sucker for cream cheese frosting in anything. I’ve always wanted to make cake truffles but I’m just way too intimidated. 🙂
Courtney - Shanon, these are adorable! They are so sweet, and I’m so glad you got to share them with Annie. I certainly wish we could’ve done this in person. I’m so happy we’ve gotten to know each other through all this! 🙂 Thanks again for participating in the shower!
Dani - What beautiful little cake truffles! They look delicious and I’m completely enamored of the pink velvet cake. I’m dying to try these myself. Thanks so much for sharing (here via Annie & Courtney’s blogs)!
lauren - I literally gasped when I saw the photos! These look so amazing… I wish I was one of your lucky coworkers. 🙂
ashley - These look great! Absolutely perfect for a shower!
One of these days I’ll get around to actually making truffles… I never have!
Nikki (Pennies on a Platter) - What a sweet friend you are for Annie! These are super adorable. I only wish I lived nearby, too, and could get a little taste of them!
Jara - I think these are so cure. I especially love the cute colouring on the inside. I definitely would prefer a velvet cake truffle over traditional chocolate ones. 🙂
Julia - I just have to tell you once again how beautifully these turned out… and they tasted fantastic too! Thanks for sharing one with me! 🙂
Georgia @ The Comfort of Cooking - Shanon, these are just stunning. Great job! You have a beautiful blog, and I’m so glad to have found it. Keep up the delicious cooking and baking! 🙂 – Georgia
Meghan - These are so beautiful! Love the pink inside too 🙂
Kim - Liv Life - First of all, congratulations to Annie on the impending arrival! What a wonderful time in life!
And secondly, but no less importantly, these little treats are simply amazing! They are so beautiful and your photos totally captured it all. What a wonderful treat!
Claire - How sweet! You and Annie are just awesome!
Tweets that mention The Curvy Carrot » Pink Velvet Cake Truffles -- Topsy.com - […] This post was mentioned on Twitter by MaryeAudet and livlifetoo, Shanon Lacy. Shanon Lacy said: Pink Velvet and Cream Cheese Cake Truffles. My contribution to Annie's virtual baby shower. Congrats, Annie! http://fb.me/RUxbmULK […]
LaChelle @ SugarDuchess - So, so pretty! Pretty colors and pretty little rosettes on top. And I love the idea of a virtual baby shower. Thanks for saying hi on my blog so I could discover yours. I love it! 🙂
PattyM - These are adorable, and what a wonderful post to go along with them! Your joy and excitement for Annie shows, both in those beautiful Pink Velvet truffles, and your words about her!
Medeja - SO colorful and so beautiful 🙂 one of the cutest truffles I have ever seen 🙂
Happy When Not Hungry - These are gorgeous! What a perfect gift!
Tina (Tangerine Tea) - I’m really impressed with how smooth the icing turned out! At first glance, I thought it was fondant cos it looked so perfect!
Patty - These are so beautiful Shanon! They sound amazingly delicious too. 🙂
Natalie - I made these for Valentine’s Day (but covered in chocolate) and they were a huge hit at work. The cake is absolutely wonderful. Thanks so much for the recipe. Oh, and rolling it out and using cookie cutters was sooooo much easier than the way I normally make cake balls…rolling the “dough” in my hands into a zillion tiny spheres. I’ll never make another rolled ball now that you’ve shown me the light!!
Phoebe - These look really awesome. I might try them myself. Wanted to ask you: You say for the cake ingredients “1 cup half and half” of what?
srlacy - Pheobe-
Half and half is a pre-made half cream and half milk mixture that you can find in the dairy section in any grocery store in the US.
Phoebe - Ok, so if I am to make it from scratch, then what would I use? heavy milk and milk? OR just use heavy cream with my mixer?
srlacy - Hi Phoebe-
I looked around at some websites for you, and this one seems like the most simple way you could make your own.
http://frugalliving.about.com/od/makeyourowningredients/r/Half_and_Half.htm
There were a lot of other sites when I googled “how to make half and half”, but I thought this one seemed like it was the easiest.
Hope it works for you!
Phoebe - Thank you so much. Yes I also googled it but found different ingredients and proportions.
The Curvy Carrot » Red Velvet Cupcakes with Vanilla Bean Cream Cheese Frosting - […] Ah, a girl after my own heart. I haven’t posted a red velvet cake recipe (only pink velvet) because I wanted to find *the* red velvet cake recipe. I was a little overwhelmed with all of […]
The Curvy Carrot » Valentine Cake Truffles - […] Pink Velvet Cake Truffles […]
30 Candy Recipes | Something Swanky - […] Pink Velvet Truffles […]
12 Sweet Spring Recipes - […] {Pink Velvet Cake Truffles – The Curvy Carrot} […]