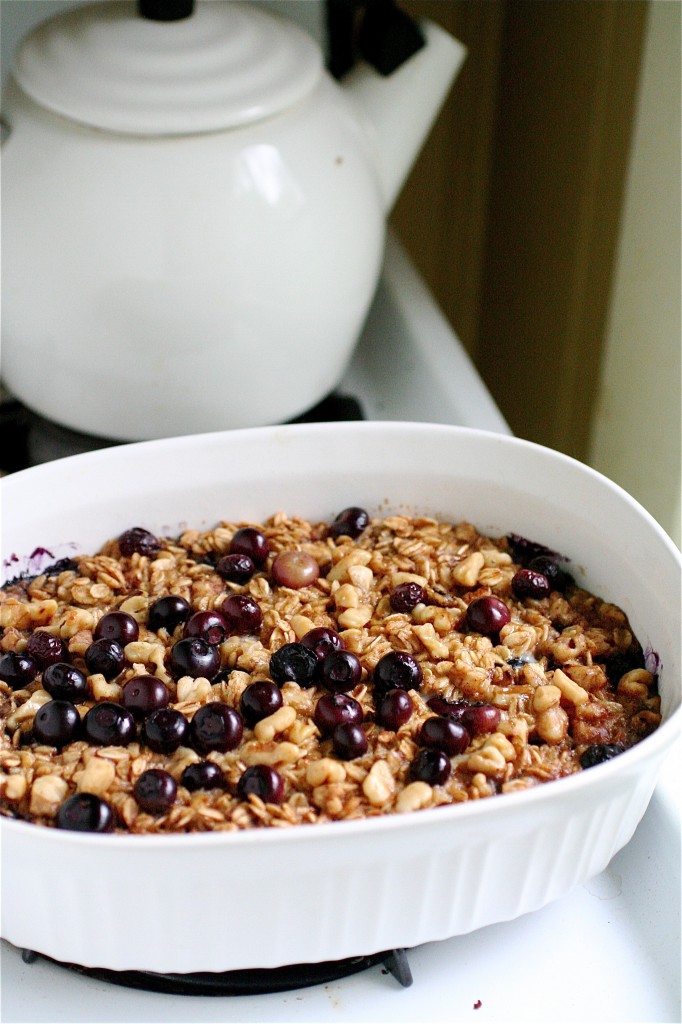
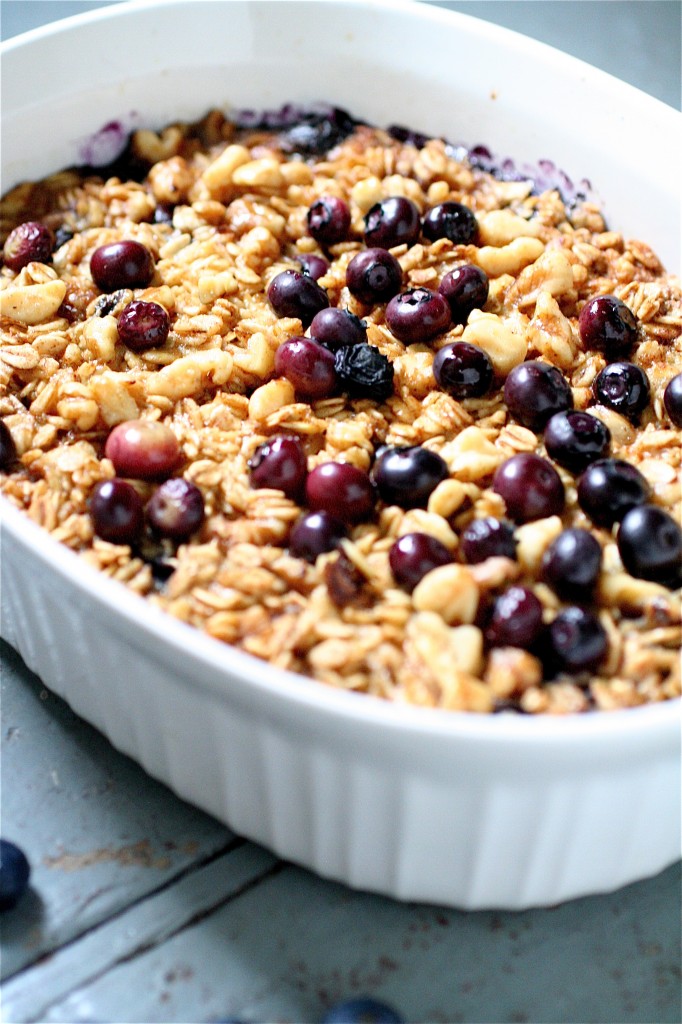
Baked Blueberry and Banana Oatmeal

I have a confession:  I am not really good at eating breakfast.  Breakfast to me is a Larabar, maybe a glass of milk, and a huge thermos of coffee on my way to work.  Because, sadly enough, the benefits of snoozing in my warm bed with my happy family (Scout the dog, and Jinx and Cosmo the cats) outweigh (at the time) the benefits of getting out of the snuggly bed, fixing the breakfast (because that takes extra effort and energy that I simply do not have at 5:45 am), and the nuisance of extra dirty dishes piled up in my sink.  Wow.  I’m good at these excuses.

But, as they say, breakfast IS the most important part of the day.  Because when I don’t eat anything, by 11am, I am more likely thinking about those French fries in the food court than the work that is in front of me.  And then I am certainly more likely to head to the gift shop where they stock loads of sugary treats and salty snacks.  If I eat a decent-sized, well-balanced breakfast, then I am more likely to stay focused, full, and less likely to binge on all the junk food I can find.

So, in order to start things out on the right foot for my new job, I vowed to try to get a decent breakfast as much as possible.  This baked oatmeal recipe made it so much easier. I baked it on a Sunday, when I had ample time to prepare and use the oven, and then I simply reheated the leftovers in the microwave in the morning throughout the week.  I literally ate this until the leftovers were completely gone, usually during my make-up application or while fixing my hair…and boy, was it ever good.  I love the way baked bananas taste…but you could probably substitute any kind of seasonal fruit here.  Here’s to full bellies in the morning….

Baked Blueberry and Banana Oatmeal

Servings: approximately 4


Ingredients

1 cup rolled oats

1/4 cup walnuts, chopped and lightly toasted

1/2 teaspoon baking powder

3/4 teaspoon ground cinnamon

Pinch of salt

1/4 cup maple syrup, plus more for serving

1 cup milk

1 large egg

2 tablespoons unsalted butter, melted and cooled slightly

1 teaspoon vanilla extract

2 ripe bananas, sliced into 1/2-inch thick pieces

3/4 cup fresh blueberries

Instructions

1. Preheat oven to 375 degrees.

2. Grease or spray a 1 and 1/2-quart casserole dish with either butter or cooking spray.

3. In a medium bowl, toss together the oats, half of the walnuts, the baking powder, cinnamon, and salt.

4. In a separate small bowl, whisk together the maple syrup, milk, egg, half of the melted butter, and the vanilla.

5. Place the sliced banana pieces in a single layer in the bottom of the prepared casserole dish.

6. Sprinkle about two-thirds of the fresh blueberries over the top of the bananas, then cover the blueberries with the oat mixture.

7. Drizzle the milk mixture over the oats, making sure to distribute the milk as evenly as possible.

8.  Sprinkle the remaining blueberries and walnuts over the top of the oats.

9.  Bake the oatmeal for 35-45 minutes, until the top is golden brown and the oats have set.

10. Remove the oatmeal from the oven and drizzle the remaining butter over the top and serve.**Feel free to garnish with whatever toppings you like: more maple syrup, butter, brown sugar, etc.


Source: Adapted from Super Natural Every Day by Heidi Swanson.


July 8, 2011 - 5:14 am

Maureen - I’ve never eaten baked oatmeal and sort of squinched up my nose at the title but this looks delicious! Good that you’ve started eating breakfast – you’ll work much more efficiently. 🙂

July 8, 2011 - 6:10 am

branny - I eat oatmeal every morning for breakfast but never something this luxurious. I think this recipe might even get my oat-hating husband to appreciate oatmeal.

July 8, 2011 - 8:18 am
July 8, 2011 - 8:35 am

Lauren at Keep It Sweet - I am a huge breakfast person and love any form of oatmeal. This looks like a delicious dish!

July 8, 2011 - 12:45 pm

Heidi @ Food Doodles - Yum! I love baked oatmeal but I need to add bananas and blueberries to it because that looks awesome! Yum 😀

July 8, 2011 - 5:36 pm

Joanna - This looks so so good! Do you think quick oats would work?

July 8, 2011 - 6:00 pm

srlacy - Hi Joanna-

Unfortunately, quick oats probably won’t work. They won’t hold up to that much liquid and the baking process-probably leaving you with a soggy mess. I would stick with the rolled kind. I hope this helps!

Shanon

July 8, 2011 - 9:05 pm

Veron - This looks so good! Do you think it’s possible to store it? I’ll be the only one eating it so i definitely can’t finish all of that at one go.

July 9, 2011 - 8:21 am

srlacy - Hi Veron-

I actually refrigerated mine for about 3 days, and I simply reheated my individual portions in the microwave each morning. It was fine, and I used every bit of the leftovers!

July 9, 2011 - 9:16 am

Josie - I made baked pumpkin oatmeal last fall, but I am really loving this combination. Blueberries and bananas are my daughter’s very favorite fruits!

July 9, 2011 - 8:15 pm

Donna - Looks delish! Happy Anniversary!

July 9, 2011 - 9:29 pm

Annie - I’m SO glad you posted this one. It was one of the first that caught my eye when I picked up this book. I’m going grocery shopping in the morning, coming home, and making this!

July 11, 2011 - 8:59 am

Nicole O - My daughter and I are so excited to try this for breakfast today! Where do the baking powder and cinnamon come in?? I’m going to assume they’re mixed into the oat mixture? I’ll cross my fingers. Also, what about the second tbsp of the melted butter? Thanks so much for sharing, we’re so excited for breakfast today!!

July 11, 2011 - 9:18 am

srlacy - Hi Nicole-please see steps #3 and #10 for the instructions. I hope you like it-it’s one of my new favorites! 🙂

July 11, 2011 - 9:55 am

Nicole O - Wow.. maybe I should have some coffee before I start baking in the morning 😉
Thanks! Our kitchen smells amazing right now..

July 11, 2011 - 10:21 am

Caroline @ chocolate and carrots - Yum! I’m definitely a morning person, so getting up to fix breakfast is natural to me. This looks fabulous! I love the addition of nuts on it too…protein!!! 🙂

July 12, 2011 - 7:47 am

Lori - Thanks for posting Shannon. This might help my son get back on the healthier track. If it just has to be reheated and then eaten, it’s easy enough for him. Thanks for the great recipes. I enjoy your blog with my morning tea!

July 12, 2011 - 3:28 pm

Courtney R - I usually add bananas and other fruit to my baked oatmeal after the fact. I love the idea of baking them in with it. I’m enjoying reading your blog!

July 25, 2011 - 1:24 pm

Sonya - I made this last night to have for breakfast and both my son and I loved it! Thanks for the great recipe

July 26, 2011 - 11:35 am

B is for Banana, Blueberry, Breakfast, and Bliss | Baby Food Scoops - […] remaining butter over pan, plate, and serve with additional maple syrup if desired.Adapted from The Curvy Carrot , originally from [/amazon_link]« 6 Steps to Make Homemade Spaghetti Sauce from Fresh […]

July 27, 2011 - 2:28 pm

DawnK - My kids made this the other day and it was delicious! I totally know what you mean about not wanting to fuss for breakfast, because you would rather stay in bed, yet a bowl of dry cereal with milk just doesn’t last all morning.

I don’t always have to work early in the morning, but making something like this the night before and just having to microwave the leftovers would be a great idea. I loved the walnuts in it, too, for a little bit of crunch.

September 12, 2011 - 4:31 am

Baked Oatmeal with Fruit » Annie's Eats - […] Source: Super Natural Every Day by Heidi Swanson via The Curvy Carrot […]

September 29, 2011 - 6:42 am

Baked Apple Cinnamon Raisin Oatmeal - […] Cinnamon Raisin Oatmeal source: adapted from Super Natural Everyday by Heidi Swanson, as seen on The Curvy Carrot and Annie’s […]

October 20, 2011 - 10:11 pm

Baked Apple Cinnamon Raisin Oatmeal - […] a baked oatmeal because it seemed it would be more palatable.  After seeing this recipe pop up on three blogs I love, I knew I had to try […]

November 23, 2011 - 3:40 am
December 10, 2011 - 11:28 am

Baked Oatmeal « Scrumptious and Sumptuous - […] Annie’s Eats via The Curvy Carrot who got recipe from the cookbook Super Natural Every Day GA_googleAddAttr("AdOpt", "1"); […]

January 14, 2012 - 9:00 am

Baked Blueberry and Banana Oatmeal | - […] from Super Natural Every Day by Heidi Swanson as seen on The Curvy Carrot Share this:PrintEmailFacebookStumbleUponDigg Tagged with: breakfast • brunch  […]

January 15, 2012 - 8:25 pm

marla - Love it, linking back to this tomorrow 🙂

January 16, 2012 - 11:55 am

Blueberry Coconut Baked Steel Cut Oats Recipe: Healthy-Diet Breakfast — Family Fresh Cooking - […] Baked Blueberry and Banana Oatmeal The Curvy Carrot […]

January 22, 2012 - 4:27 pm

Blueberry Banana Omega 3 Oatmeal Bake | Knit and Bake - […] Adapted from The Curvy Carrot […]

February 18, 2012 - 3:59 pm

Baked Blueberry & Banana Oatmeal : Cookin' with Moxie - […] Blueberry & Banana Oatmeal (adapted from The Curvy Carrot) […]

May 3, 2012 - 10:35 pm

Stefanie - This looks delicious but I was wondering if I could sustitute the egg with something else since my son is allergic, any ideas? Thanks!

May 4, 2012 - 8:24 am

srlacy - Hi Stefanie-

I found this link for you that might be helpful:

http://www.kidswithfoodallergies.org/resourcespre.php?id=104&title=Basic_recipe_substitutions_for_egg_allergy

May 23, 2012 - 8:11 am

Baked Blueberry Banana Oatmeal « Two Kitchens, One Story - […] The Curvy Carrot, adapted from Super Natural Every Day by Heidi Swanson. Share this:TwitterFacebookLike this:LikeBe […]

June 6, 2012 - 4:40 pm

Baked Oatmeal with Fruit » Cook Like a Champion - […] Super Natural Every Dayvia The Curvy Carrot and Annie’s Eats Printer Friendly […]

July 20, 2012 - 6:11 am

Cake for Breakfast | all-purpose and semi-sweet - […] 5. Baked Blueberry & Banana Oatmeal […]

September 12, 2012 - 12:57 pm

Stylish Cuisine « Baked Oatmeal with Fruit - […] Baked Oatmeal with Fruit Recipe from Annie’s Eats, who found it in Super Natural Every Day by Heidi Swanson via The Curvy Carrot […]

October 13, 2012 - 9:15 pm

Christina - Made this today with raspberries and blueberries and left out the bananas. Absolutely delicious!

November 27, 2012 - 10:29 pm

Baked Oatmeal with Bananas and Apples | GranolaNola - […] from The Curvy Carrot via Hedi Swanson’s Super Natural Every […]

January 5, 2013 - 10:51 pm

debbie m - can this be made the night before and then cooked in the morning? Have you tried subsituting the rolled oats for steel cut?

January 6, 2013 - 10:48 am

srlacy - Hi Debbie-

If you only combine the dry ingredients the night before, you should be ok. I would think that the oats and banana would become really soggy and soupy if it’s prepped the night before and baked the morning after. I have not tried it with steel cut oats-they traditionally have a much longer baking time than rolled oats, so you may have to adjust your baking time. Let me know if you try it-I love steel cut oats and would love to have another recipe to use them in!

March 5, 2013 - 12:24 pm

Lulus.com Fashion Blog - […]  (recipe adapted from Curvy Carrot) […]

April 24, 2013 - 12:00 am

Baked Banana and Blueberry Oatmeal | Food, Folks, and Fun - […] Sprinkle the remaining blueberries and walnuts over the top of the oats. Bake the oatmeal for 35-45 minutes, until the top is golden brown and the oats have set. Remove the oatmeal from the oven and drizzle the remaining butter over the top and serve. You may choose to garnish with drizzled maple syrup or brown sugar although I don’t think you’ll need it. Makes 4 servings. Source: Inspired by this recipe […]

April 29, 2013 - 7:27 am

Baked Oatmeal with Fruit | Spoonful of Flavor - […] Source Annie’s Eats, originally from Super Natural Every Day by Heidi Swanson, via The Curvy Carrot […]

June 12, 2013 - 8:15 am

about Baked Oatmeal | food - […] OATMEAL Adapted from Super Natural Every Day via The Curvy Carrot INGREDIENTS 1 cup steel cut oats 1/2 teaspoon baking powder 1 teaspoon salt 1 teaspoon […]

June 24, 2013 - 2:10 pm

Jerrie - Love this recipe! As I’m working on a new me and trying to lose some weight, would appreciate info on nutritional/calorie count, etc. Thank you.

September 22, 2013 - 9:56 am

Baked Blueberry and Apple Oatmeal - Cookie Monster Cooking - […] Slightly adapted from The Curvy Carrot.  Originally from Super Natural Every Day.  Also seen on Annie’s […]

January 24, 2014 - 7:36 am

a girl + a plan » A Bigger Story - […] had made this Blueberry & Apple Baked Oatmeal several times before, but it had been a while.  Y’all.  It is so good.  The original […]

June 5, 2014 - 5:45 pm

Dinah's Dishes – Baked Blueberry and Banana Oatmeal - […] Adapted from The Curvy Carrot […]

Four Cheese White Pizza (and a Blog Anniversary!)

This will most likely be a long post.  I won’t be offended if you skip all the writing.

But, The Curvy Carrot (my extracurricular baby) has just turned one.

I cannot believe that I started this blog one year ago.  I had just gotten back from the Food and Light Workshop in Boulder, Colorado with Annie.  I had been tossing the idea around in my head for a long time.  There I was, the ONLY participant at the workshop with these super talented and ingenious photographers/chefs/bloggers…and when I introduced myself, I was totally embarrassed to admit: “I don’t have a blog….yet.”  Suffice it to say, I think I have come a long way in a year, but I know I have so much more to learn.

A year ago, I was living with my parents, in the middle of a very intense period of my life:  finishing up residency, going through a divorce from a very unhealthy relationship, trying to sell a home in a super horrible market, but I simply decided to lay it all out there and start doing what I wanted to do.  No more limitations, no more disappointments, no more sacrificing what I wanted for anyone else. And what I wanted to do was channel my energy into something that would inspire me, lift me up, challenge me, and allow me to grow as a novice cook and blogger.  I was told so many times that I didn’t know how to cook, I couldn’t scramble an egg the right way, that my way was always the wrong way, that I chopped an onion wrong…just to name a few.  No more.  I wasn’t listening to or believing that anymore.  Instead, I was going to start listening to that faint voice in my head that was echoed by one of my dearest friends very loudly (Annie, of course) who told me that I could do it.  Even if no one ever read this little blog….it was mine.  All mine.  And the pictures? All mine.  And the food? All made and tasted by me…and yes, I can cook.

I’ve reached several goals in a year.  I’ve posted every other day religiously, tried new foods, challenged my lack of creativeness, made both Foodgawker and Tastespotting (originally I was so intimidated to even submit anything!), made lots of new and amazing friends through the blogging world (you are the best-I know I don’t return comments as frequently as I should, but I will try to be better, I promise!), figured out the do’s and (definitely) do not’s of the blogging world (but I am still learning, of course), and, all along the way, I am celebrating the power that lies within the ability to just stop saying why you can’t do something….and suddenly figuring out that you most certainly can.

So, a year later, I am in a (very) tiny and (very) hot little one-bedroom basically studio apartment with two cats and one very tired doggy (who loves her new friends at “camp” everyday) with an oven that only fits one baking sheet at a time and an excruciatingly long pre-heat time.  I have really no counter space, and although I have overhead skylights, the harsh direct sunlight is very difficult to work with.  I’ll be experimenting with diffusers, white boards, and props.  I’ll be trying to branch out of my macro lens dependence.  I’m dedicated to making better (and hopefully healthier!) food and taking better (natural light) photos (but I am still going to throw indulgences in there every so often, you know).  Bear with me.  I’m planning a very fantastic upgrade to the website within the next few months to make it easier to navigate and more “professional” looking.  And as far as I am concerned, I am just getting started.

To celebrate my “blog anniversary”, so to speak, I am putting links to ten of my most personal favorite posts over the past year.  My, what a fun ride it has been!

Henri’s French Onion Soup

Candy Corn Cupcakes

Champagne Cupcakes with Champagne Buttercream

Fried Bocconcini

Savory Spinach Bites

Deconstructed Egg and Cheese Sandwiches

Chocolate No-Bake Cookies

Cherry Chocolate Kisses

Cheese Enchiladas

French Onion Soup Crostini


So, now, let’s talk about this pizza.  I have made pizza dough before, but this particular pizza dough recipe is my favorite so far, thanks to Annie.  I followed both her tutorial (please visit her website for detailed instructions and photos) and recipe to a tee, and I couldn’t have been happier.  Now I have pizza dough (it reminds me of Pizza Hut’s Pan Pizza) in my freezer, waiting to be thawed and made into some great weeknight pizzas over the coming weeks…and seriously, what offers more creative liberty than making your own pizza?  And what makes better leftovers than pizza?

I have always been a fan of white pizzas, and with all these great options for cheeses out here,  I knew I couldn’t go wrong with a four cheese pizza..with my favorite herb: basil.  The cheese choices could be easily substituted with your own favorites, but I personally loved the combination of both the softer ricotta and goat cheeses with the mozzarella and Parmesans.  I put a little red pepper flakes on mine and sprinkled a teensy bit of flaked sea salt on top.  SO GOOD!

Four Cheese White Pizza

Servings: 1 pizza, approximately 6-8 slices

Ingredients

For the dough:***This recipe makes enough for two pizzas.

1/2 cup warm water

2 and 1/4 teaspoon (or one packet) of instant yeast

4 cups (22 ounces) bread flour, plus more for rolling out your dough

1 and 1/2 teaspoons salt

1 and 1/4 cup water, at room temperature

2 tablespoons olive oil

For the pizza:

3 tablespoons olive oil, plus more for brushing the pan

3 teaspoons garlic, chopped (about 3 cloves)

8 ounces (1/2 pound) fresh mozzarella, sliced and coarsely chopped

3 ounces fresh goat cheese, crumbled

1/2 cup part-skim ricotta

1/4 cup Parmesan cheese, grated

3 tablespoons thinly sliced fresh basil

Instructions

1. For the dough:  In a 2-cup measuring cup, add your 1/2 cup of warm water.

2. Add the yeast to the warm water mixture and let sit at room temperature until the mixture is bubbly and creamy, about 5 minutes.

3. In the bowl of your standing mixer fitted with the paddle attachment, combine the flour and salt.

4. Add the 1 and 1/4 cup of room temperature water to the water/yeast mixture.

5. With the mixer running at low speed, slowly pour the water/yeast mixture and olive oil into the bread/salt mixture, and mix until the dough forms a cohesive mass.

6.  Switch to the dough hook and continue to knead the dough at low speed until elastic and soft, about 5 minutes.

7. Transfer to an oiled bowl (I used cooking spray), cover with a tea cloth or plastic wrap, and let rise until doubled in size, about 2 hours.

8. Once risen, punch down the dough to deflate it and transfer to a clean, lightly floured flat work surface.

9. Divide the dough into two equal portions. If you are freezing one portion of dough, tightly wrap it in plastic wrap and place in a freezer bag.  If using the dough immediately, let it rest for at least 10 minutes at room temperature (but no more than 30 minutes).

10. For the pizza: Preheat the oven to 450 degrees.

11. Brush a rimmed baking sheet with olive oil and set aside.

12. In a small bowl, combine two tablespoons of olive oil with the garlic, set aside.

13.  On a clean and lightly floured flat work surface, roll out the dough to your desired shape.  **Due to the shape of my baking pan and my lack of a pizza stone, I opted for a rectangle.

14. Transfer the dough to the baking sheet and brush lightly with your prepared olive oil/garlic mixture.

15. Layer the mozzarella and goat cheeses, making sure to leave at least a 1/2-inch border of exposed crust.

16. Crumble the ricotta cheese over the pizza, followed by the Parmesan cheese.

17. Bake the pizza until the cheese is melted and the crust is golden brown, about 18 minutes or so.

18. Once out of the oven, lightly drizzle the pizza with the remaining olive oil/garlic mixture.

19.  Sprinkle the pizza with the fresh basil, and serve immediately.

Sources:  Pizza dough directly from Annie’s Eats, originally adapted from Baking Illustrated.  Pizza adapted from Bon Appétit, via Epicurious.


July 6, 2011 - 5:18 am

Blog is the New Black - Great post! Congrats! So glad you decided to start a blog because you are a fav of mine!

Recipe looks AMAZING!

July 6, 2011 - 5:27 am

Apron Appeal - Such a milestone! I would have liked to start out with a photography workshop, I feel like I’m a bit behind the pack because I know so little about styling and photography, but Im learning we all have a weakness and if we wait until we are prefect or the the food is perfect, the shot, the plate etc…there would be no such thing as a food blog.

July 6, 2011 - 6:35 am

Lauren at Keep It Sweet - Happy blog birthday! Sounds like you made the right decision when you put your passion first and started a blog!

July 6, 2011 - 7:22 am

Laurel - I am so glad you found the courage and strength to start “The Curvy Carrot” because your blog is now one of my favorites!

July 6, 2011 - 7:30 am

georgia - Dad and I are very proud of you Shanon on your blog! you have come so far since last year! I miss the food and the volcanic kitchen when you exploded in your cooking! keep up the great work, you have some barriors there in that tiny apartment but knowing you like I do, you will overcome those too! Dad and I love you and congratulations on your one year anniversary! It is hard to believe it has been a year!

July 6, 2011 - 7:38 am

Lori - Happy Birthday Curvy Carrot! I am so glad you started this blog because I visit here every day. You have become part of my morning routine. I sit here with my cup of green tea and try to wake up! Can’t wait to try this pizza…it looks amazing. Thanks for the inspiration.

July 6, 2011 - 7:44 am

branny - That was very brave of you to go to food and light without a blog. I love that you call it your extracurricular baby. Happy blogiversary – I hope to see many more to come.

July 6, 2011 - 8:34 am

themilkmanswife - Happy blogiversary! I am a new reader to your blog and it has quickly become one of my favorites. Keep up the great work and best of luck in your new location!

Pizza looks great too. 🙂

July 6, 2011 - 8:49 am

Laurie@TheBakingBookworm - Happy bloggaversary!! We’re big homemade pizza lovers here too! Can’t wait to try it!

July 6, 2011 - 8:51 am

Josie - Gorgeous pizza, and beautiful post! Happy Blogiversary – keep doing what you’re doing!

July 6, 2011 - 9:31 am

Emily - Keep up the good work! As a pescetarian, I love all your recipes. Your blog is one of my favorites!

July 6, 2011 - 10:17 am

Tara - Congrats on your first blogiversary , Shanon! It’s been great watching you grow as a blogger in the past few months since Annie “introduced” you to me. Cheers to continued growth, happiness, gorgeous photos and delicious recipes!

July 6, 2011 - 11:46 am

J.Bussell - Hello old neighbor & friend! Just wanted to let you know that I have been following your blog since you started and absolutely love it! I have made so many Curvy Carrot recipes, and they have all been fabulous. Keep up the excellent blogging, Shanon. This girl has to eat! 🙂

July 6, 2011 - 12:03 pm

Heidi @ Food Doodles - Happy blogiversary!! Your pizza looks incredible! The basil on top looks soooo good 😀

July 6, 2011 - 3:42 pm

The Little Kimchi Pierogi - Congratulations! Its pretty amazing that you started just a year ago…I started a couple weeks ago and feel like I have a long way to go. You’re an inspiration!

July 6, 2011 - 6:58 pm

Kelsey - Happy blogiversary!

July 6, 2011 - 7:36 pm

Emily - Happy anniversary! I am so glad you decided to listen to that voice and started your blog. I visit very often, I love your blog! It is one of my daily stops when I am checking out the web!

July 6, 2011 - 10:54 pm

Jessica - Happy blog birthday! If I didn’t know your blog has only been around for a year I would have no idea… until today I thought your blog has been up and running for years because of how professional everything you do is! You definitely deserve to celebrate all you have accomplished… keep up the good work!

July 6, 2011 - 11:53 pm

Maria - Congrats! Your story inspires me. I started a food blog in January and have enjoyed following yours. The pics are beautiful; I have a long way to go with my photography and wish I had signed up in time for this summers Food & Light workshop! Anyhow, taking risks and following our passions in life is good for the soul, so again, congrats on the blog birthday and following your dreams!

July 7, 2011 - 3:51 pm

natalie (the sweets life) - your blog is AMAZING for only having been doing this a year—congrats on a fabulous year and a blog to be proud of! excited to see more in the future!

July 7, 2011 - 4:18 pm

Tara - Thanks so much for the inspiration! The food and the photos are great, but your passion behind both is really what keeps me reading! Good luck to you in your new city, new chapter.

July 8, 2011 - 5:56 am

Kellie - Happy blogaversary! So exciting, Shan, and proud of you as always. Hugs!

July 8, 2011 - 12:41 pm

Robyn {Planet Byn} - Happy blogiversary Curvy Carrot! I made your Halloween Candy Bark and Churros Cupcakes, and both were amazing, so please keep the treats coming! I also have a super teeny tiny kitchen and a serious lack of counter space, but as Annie says, if you’re inspired and motivated you can make it happen!

July 9, 2011 - 9:35 pm

Annie - I love you so much, my dear. I am so proud of you and your blog, and how much you both have grown this year! I’m thrilled you choose to take the high road and blog with integrity, making new and different things and be constructive instead of competitive. You are awesome and you better not forget it.

And, I’m glad you love the pizza dough as much as we do. This pizza looks so fabulous!

July 12, 2011 - 8:01 pm

Claire - Just through your blog, your energy, enthusiasm, and attitude are contagious!

September 20, 2011 - 3:29 am

Week in Food - […] Pizza: I started out with this recipe for a White Pizza http://www.thecurvycarrot.com/2011/07/06/four-cheese-white-pizza-and-a-blog-anniversary/ and we added our own toppings: artichoke hearts, fresh garden tomatoes, basil, spinach, and olives! […]

November 23, 2011 - 1:36 pm

Carol - This looks so great! Cheese & basil together is so delicious.. I’ll definitely have to try this one.

March 23, 2012 - 12:54 pm

Emily (New York, NY) - Looks soo tasty! I LOVE white pizza, really the only kind I can eat multiple slices of (in one sitting :X) but hate making it at home because of the pizza crust! I cannot find one I really like! This one looks delish so I may just have to give it a try! Thank you for sharing 🙂

March 31, 2012 - 8:41 pm

Jim R - I made this tonight but added grilled chicken and grilled mushrooms. And then grilled the pizza…AMAZING. Was the hit of our party, thanks for the recipe!

April 15, 2012 - 1:09 am

20 + Awesome Recipes for Pizza | GIF Peanut Butter - […] 10.) Four Cheese White Pizza […]

April 25, 2012 - 7:58 am

I love food. « jessicacorra - […] on Cooking Light’s website although they use flounder, and the pizza dough recipe came from here. Share this:TwitterFacebookEmailLike this:LikeBe the first to like this […]

April 28, 2012 - 9:16 pm

Laura - I just found this recipe on Pinterest! Is it possible to make the dough without a stand mixer? I don’t have one but would love to experiment with making pizza from scratch.

April 29, 2012 - 5:57 pm

srlacy - Hey Laura! Nice to meet you! You could try making it without the stand mixer-using your hands. It might make for a great work-out with all that kneading! I figure if my grandmothers could make pizza dough (before the age of convenient stand mixers), we all can too!

June 11, 2012 - 3:48 pm

RecipeNewZ - I found this post though Pinterest. The photo was so beautiful that I just had to come here to read the recipe! Love it! And love your site :-).

I would like to invite you to share this post (and your other posts 🙂 ) on a new photo based recipe sharing site that launched in May. The idea is simple: all recipe photographs are published within minutes of submission. And, of course, the images link back to the author’s site.

It’s called RecipeNewZ (with Z) – http://recipenewz.com

I hope you get a chance to visit and to share some of your delicious posts with our viewers. It would be a pleasure to have you on board 🙂

June 29, 2012 - 5:33 pm

sara - This pizza looks incredible! Love all the cheeses and the basil on top…I’m in love!

July 17, 2012 - 5:05 pm

Clueless in the kitchen? | Single mom eats - […] Four Cheese White Pizza […]

July 19, 2012 - 5:14 pm

Frozen Pizza V. Rudi’s DIY Pizza - […] favorite pizza recipe is this one I found from The Curvy Carrot. It’s a beautiful four cheese white pizza (white pizza is so hard to find frozen or at a […]

September 6, 2012 - 8:00 am

Four cheese white pizza | CookBook411 - […] Cheese White Pizza Via and recipe available at thecurvycarrot.com Posted by admin in Pizza, Vegetarian and tagged with cheesy pizza, four cheeses, pizza recipe, […]

September 6, 2012 - 6:02 pm

homemade pesto bread | CookBook411 - […] Pesto Bread Via and recipe available at thecurvycarrot.com […]

October 6, 2012 - 12:09 pm

The Curvy Carrot » Eggplant Focaccia and The Village Press Oil Dipping Sauce - […] pound pizza dough **I used this super easy version of my favorite recipe.  I always keep some frozen in my fridge to […]

October 13, 2012 - 5:00 am

The Curvy Carrot » Heirloom Cherry Tomato Pizza Margherita - […] Let’s start with the dough. You can use a pre-made dough here, or this one. […]

October 29, 2012 - 2:47 pm

Dana - Okay this looks soo good. I know I’m a little late but congrats on all your milestones and I admire your determination, struggles and hard work. Following your feed 🙂

January 25, 2013 - 9:10 pm

Four Cheese Basil Pizza « Project-Nerd - […] Courtesy: The Curvy Carrot […]

January 26, 2013 - 7:54 pm

Hales - Anyone have suggestions on what to serve it with? Or what you did serve it with? I’m thinking salad, but I can’t quite decide.

April 10, 2013 - 2:31 pm

teresa ashcroft - fabulous recipe. thanks!!

May 13, 2013 - 6:17 pm

Four Cheese White Pizza - […] source:  thecurvycarrot.com […]

May 24, 2013 - 12:34 am

Four Cheese White Pizza | WorldFoodRecipes.com - […] Original Recipe: http://www.thecurvycarrot.com/2011/07/06/four-cheese-white-pizza-and-a-blog-anniversary/ […]

July 10, 2013 - 1:28 pm

Beth - It’s always difficult to go outside the security of “the box”…That being said your on your way to a great blog… perfecting is always half the battle but you’ve already won the fight.
Keep up the great site and good luck… By the way the pizza was yummy

September 15, 2013 - 4:56 pm

Jeri - I made this when I had family over and everyone thought that it was delicious! I will be making this pizza again. Thanks for sharing!

December 24, 2013 - 3:36 am

Joanne T Ferguson - G’day! Happy first blog anniversary! Wish you MANY, MANY more, true!
Your pizza and photos have my mouth watering! Thank you!
Cheers! Joanne

March 29, 2014 - 12:08 pm

White Pizza Delicious-ness | smile, there's gin - […] Here is the original recipe from The Curvy Carrot […]

August 4, 2014 - 2:32 pm

Sautéed Onion Potato Pizza - […] For the dough (dough taken from Thecurvycarrot’s Four Cheese White Pizza) […]

Triple Berry Turnovers


Happy 4th of July!


I’m a last minute kind of planner-actually I have been moving in and had orientation for my new job this week, so baking for the 4th of July was the last thing on my mind.  I still wanted to make something a little celebratory for the holiday, but I wanted something quick and easy.  I also wanted to use up some of the berries I had bought at the market this past week.

This recipe is super easy.  It’s actually one of the easiest “pastry” recipes I have ever tried.  I went ahead and used store-bought pie dough (I don’t have the time anymore to make my own…but someday I will find a good recipe to share), and I decided to use blueberries, raspberries, and blackberries in the turnover.  You could use pretty much any kind of fruit here.  In fact, I still have another pie dough on hand, so I might be trying this with my strawberries and some peaches in a few days!  I didn’t add any spices to the mix, but depending on the type of fruit you use, you could always add some cinnamon, nutmeg, or ginger, even.

Think of this dessert as a very quick way to satisfy a craving for a fresh fruit pie.  And what is more American than a fruit pie?

I hope you have a wonderful 4th of July.  This year, freedom means a lot more to me than ever before.

Triple Berry Turnovers

Servings: 4


Ingredients

1 store-bought pre-made pie dough, thawed

1/2 cup fresh blueberries

1/2 cup fresh raspberries

1/2 cup fresh blackberries

1/3 cup sugar, plus more for sprinkling on top of the turnover, if desired

1 teaspoon fresh lemon juice

1 tablespoon unsalted butter, cut into pieces

Instructions

1. Preheat the oven to 375 degrees.

2. Place the thawed pie dough round on an ungreased but rimmed (the berry juices will overflow, so the rimmed baking sheet is crucial) baking sheet.

3. In a separate medium bowl, combine the blueberries, raspberries, blackberries, lemon juice, and granulated sugar.  Toss lightly to coat the berries with the sugar mixture.

4. Transfer the fruit mixture to the pie round and gently smooth the fruit to within 2 inches of the edge of the pie dough.

5. Distribute the pieces of butter evenly over the fruit mixture.

6. Gently fold and pinch the pie dough as far as possible over the berries (the center of the berries will not be covered by the dough), pleating as necessary.

7.  Bake until the dough is golden brown and the fruit is bubbly, about 30-40 minutes or so.

8. Remove the turnover from the oven and let cool for at least 10 minutes before cutting into separate wedges.


Source:  Adapted from Williams-Sonoma’s Cocktail Parties.

July 4, 2011 - 8:06 am

Lauren at Keep It Sweet - What a delicious use of summer berries!

July 4, 2011 - 7:11 pm

Maureen - These turnovers look so good!

July 5, 2011 - 7:30 am

Sasha @ The Procrastobaker - These look so jam packed with berries, such a lovely summery treat 🙂 lovely photos too, as always!